SEO Image Optimization is easy unless you know how to do it perfectly.
Bloggers and creators throughout the world are generally talking about how to write a perfect blog post, or how to optimize your website but very few are talking about optimizing images for better SEO.
Now, here comes the good part.
To ease you in this journey of Image Optimization, I am your guide, to put you on the sled and drive you from all the basic to technical Image SEO Optimizations for every image you are going to post on your website.
By the way, I am a writer from our Editorial Staff, whose sole purpose is to give you an intrusive knowledge about SEO Image optimization so you don’t have to go anywhere in the future.
Therefore, invest a few minutes in this post, and forget about any future worries related to SEO Image optimization.
How does SEO Optimized Image help?
An SEO optimized image is nothing but an image that is capable of rank with ease and facilitates traffic to their post.
And if you aren’t optimizing your images, for sure, it will be the next major element (after the content itself) that holds your post to rank on google’s first page.
But that’s more here.
The recent core update of Goggle 2020, websites with better authority also rank better in Google queries, and this also applies to images and rich snippets.
So, a search engine optimized image serves better not only in the ranking but also in building the authority of your website in your niche.
This is how it is formulated
SEO Optimized Image = Better Ranking = More Traffic = More Authority & Trustworthiness
Therefore, doing image optimization is a healthy practice that every blogger and creator should employ on their web.
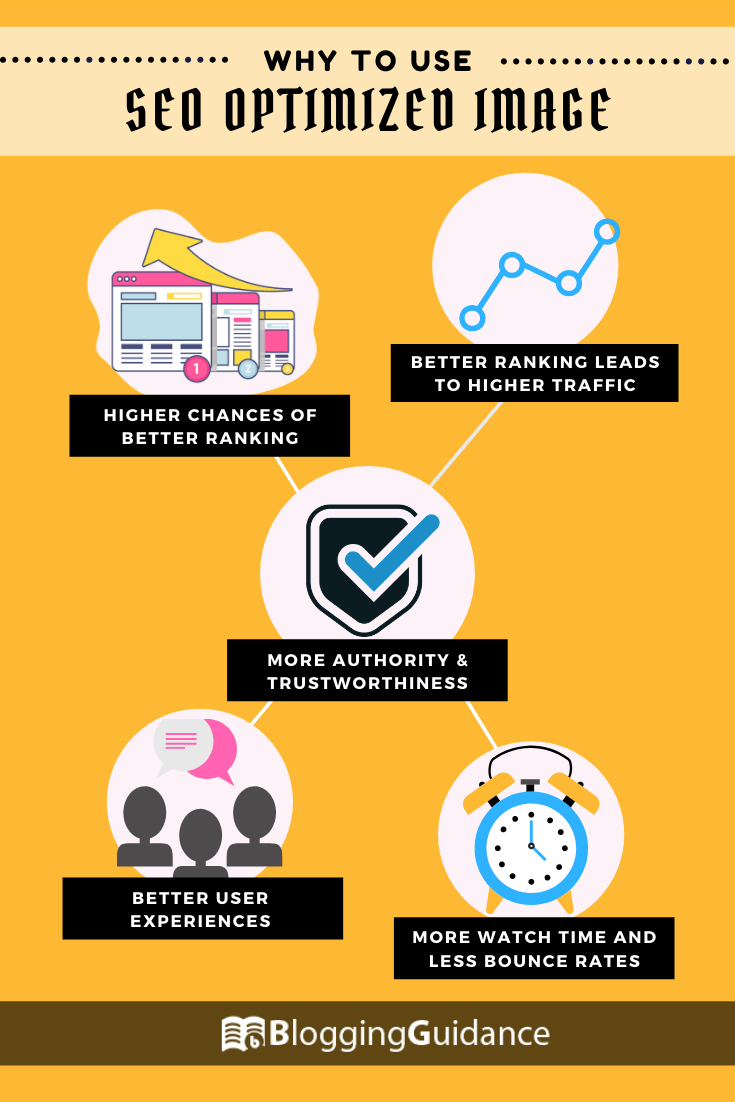
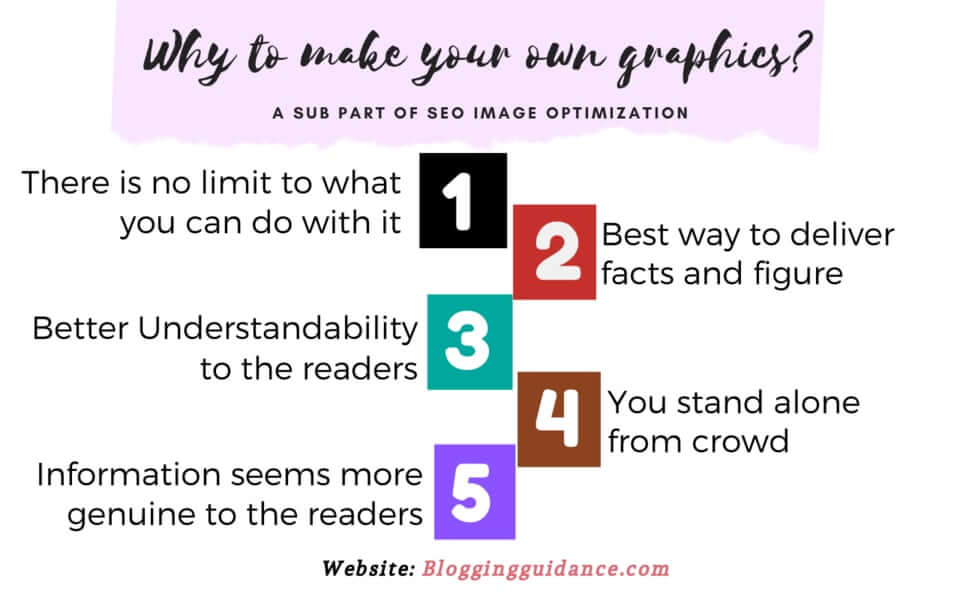
This short-cum-infographic illustrates, “Why should you use SEO optimized Image in your web?”
Now, you’re thinking, “How I make my post’s image SEO friendly”, we get you there but before going further, let’s point out some markers on how an SEO optimized image should look like.
How does an SEO Friendly Image look? (Key Features)
Some key features of SEO optimized images that are commonly used by bloggers.
- Relevancy
- Proper Captions
- Optimized alt title and alt tags
- Definite Compressed Size
- Proper Scaled images
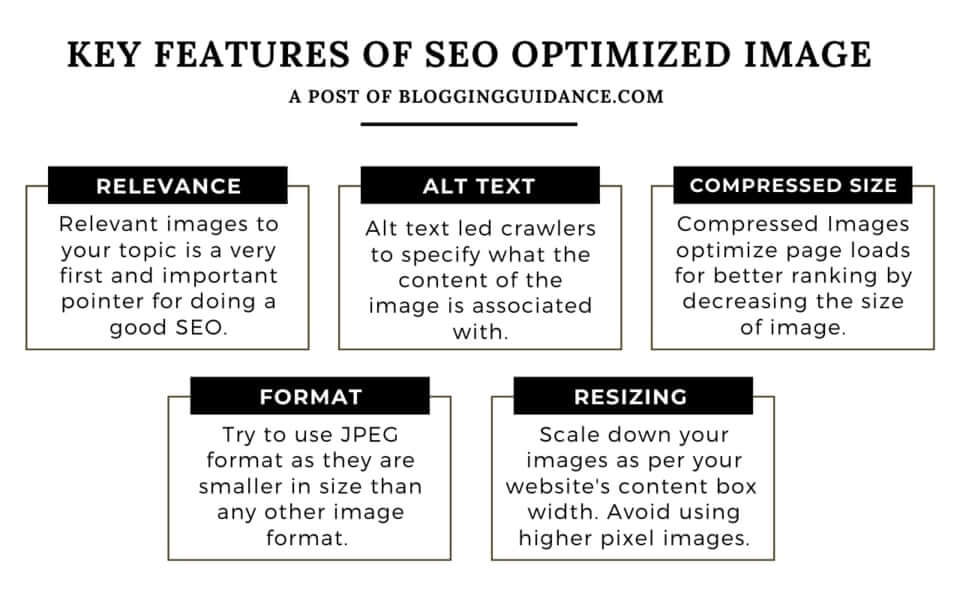
This is the perfect picture to demonstrate how an SEO friendly Image should look.
Now, without doubt, you are completely convinced, “why you should use an SEO friendly Image in your post”. It’s time to show you how it is done with ease.
Perfect Framework For Perfect SEO Image Optimization
Remember the first time you add an image to your blog—whether its a WordPress site or blogger or any platform—you just add it directly from your local pc or you do some SEO optimization.
But that’s not enough. Most of the bloggers don’t know what is the right approach. All we do is, ‘add piles of images’ to our websites.
So let’s start the process of Image optimization.
We do this in three trouble-free steps that make your image (on your web) friendly to search engine’s crawlers.
- The Creation Process
- Processing the Image before uploading
- On-Page Optimizations
Step 1: The Creation Process
1. Relevancy
Be relevant to your topic
This is the very first step that majorly points to the most crucial aspects of Image SEO i.e. the relevancy.
For any query, there are numerous pages that satisfy the user intent. But if users are specifically looking for the image file then a relevant image increases the chances of getting clicks.
Altogether, it implies in one direction i.e. the cruciality of relevant images.
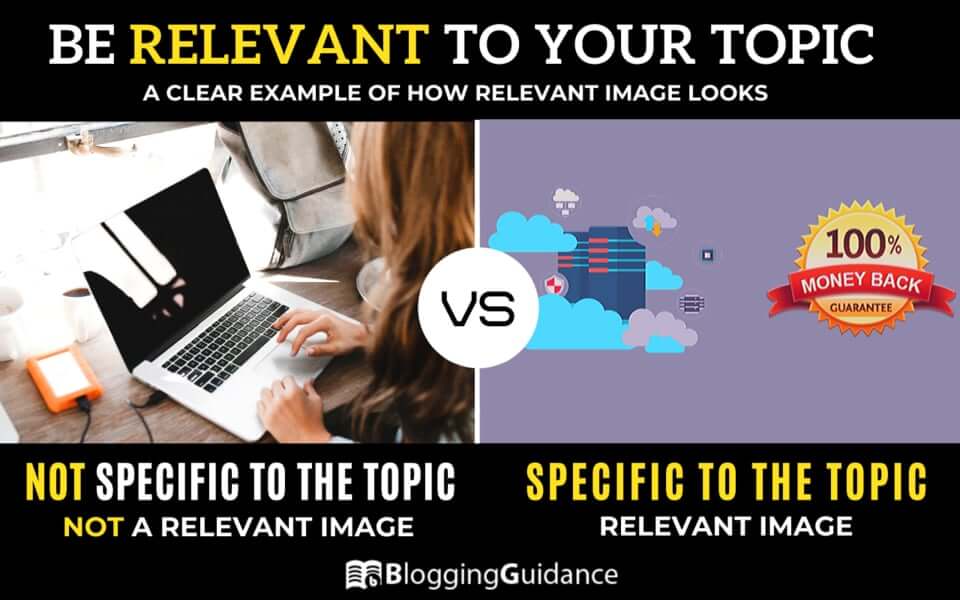
Just consider the above figure, if I am writing a post on the keyword, “Best Hosting Provider With Money Back Guarantee” and adds an image of a laptop with a notebook.
In this scenario, the image (laptop with a notebook) doesn’t have an absolute relevance to the topic. Hence it is not a relevant image. I made a figure for you guys
I know this is a creepy example, sorry for that. But I am sure, you understand, what I am talking about.
As per the rummers, thought to be true, Google is working on image learning to make their crawlers to learn the image’s content which is again a clear sign of relevancy.
So, “Relevant images to your topic is a very first and important pointer for doing a good SEO.”
So, using relevant images is a good SEO practice that you should do with every image that you upload to your web.
2. Use Free Stocks Images
It doesn’t seem to be true if you consider that more than 98% of websites majorly use free stock images.
Now, the question arises, “Have you ever tried these free stock images?”. I mean seriously, everyone does, so do I (to some extent).
Now, let’s explore the common platforms—maybe you currently using them—from which you can get free stock creative commons images. These are Pixabay.com, Pexels.com, SkitterPhoto.com, StockSnap.io, and Freestocks.org.
But there’s more.
These are Flickr.com (Creative Common filter required), FoodiesFeed.com, and Unplash.com.
I divided the section in two because the websites which I stated later, has a collection of not-obvious photos that seems breathtaking and realistic to the users.
Although there are more websites—this is beyond what we are actually discussing. So, I invite you to visit our other blog with title, 5 Best Sites For Bloggers to Get FREE Stock Images.
I am not saying you should avoid the above mentioned familiar website but my base of talking is that you should give a shot on these unpopular ones for getting more unique images for your post.
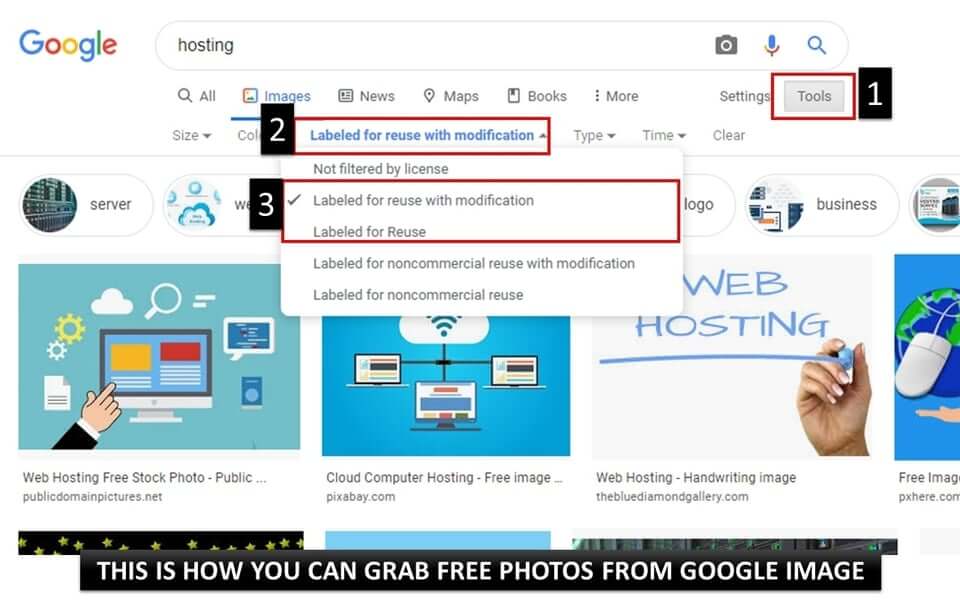
Do you know how to grab Free awesome photos from Google Image?
Follow these simple steps and you got free images that you can use in your blog or websites.
- Open the Google Image Window.
- Type your appropriate keyword to your topic. Let’s say, ‘hosting’
- Hit search.
- Navigate to the ‘tools’ bar.
- In ‘Usage Rights’ select either ‘Labeled for reuse’ or ‘Labeled for reuse with modification.’
- And you get free images from google.
This is how it looks. (check the image)
Hence, from now, you got an overview of the various platforms from where you can use free images without any copyright issue.
3. Make your own Graphics
First, “Why do I stop using stock photos and make my own?”
Because to give my personal touch, and to make it more informative to the readers. And this is what the professional suggests.
Professional blogger avoids and recommends not-to-use free stock images because major of them (stock images) are too often seen on many posts and websites that make these images being-familiar and un-attentive to the user’s eyes.
This is not my thought, it is just human psychology. According to them, when the human being is looking for new information, they seeks-on new things and avoid the familiar ones.
So, What’s the alternative that also saves your money?
The answer is, “Invest in creating them or Make your own”. And that’s what I do and what I recommend.
Offline Tools For Image Creations
a. For Pcs Users
- Photoshop (All-rounder)
- Paint Tool by Windows (low-end computers)
- Microsoft PowerPoint (I personally use them more often for image creations)
b. For Mobile Users (Android/ iOS)
- Inshort-Image and Video Editor (I personally use)
- Snapseed by Google
Online Tools For Image Creations
- Canva (a major online tool that I commonly use)
- The Hoath (logo Maker)
- Snappa
- Pablo
But if I missed some tools that maybe you are using, let us know in the comment section. This help will be very appreciable not for us but also to the other readers. So, don’t forget to list your favorite tool in the comment section.
One more thing that I want to share with you is, avoid Clickbait tactics, as it hurts the SEO in the long run. This is because of two factors.
First is, if the user does not get the information that they are searching for—result: they bounce-off. And this would definitely increase the bounce rate which is an alarming sign for any website owner.
While the second is, it decreases the trust among the reader. As you’re making fool of your fellow users.
By doing this, you don’t realize that you can make them fool only a few times but at last, they know what are you doing. Altogether, this develops a false-image about your website in the user’s eye.
And in the future, if they find your website in search results, for sure, they avoid clicking your URL.
Therefore, Be Clean and Avoid Clickbait Images.
It’s time to jump to the next section, and avoiding this might cost you a lawsuit that again no one wants.
4. Beware of Copyrights
In a case of using a copyrighted image, a website had been fined $8,000 and that no one wants to pay from their pockets.
So, it’s better to avoid silly mistakes that might flood away your hard-earned money. But “How do I stay away from a Copyright Strike from Images?”. This is how you can avoid it.
- If you are using an image from Google Image (whether with reuse label) try to give credits to the native website in captions.
- Never use images from non-reputed sources. As there might be a chance that it was not from the original creator.
- Try to make your own graphics.
- You can also mail various creators to ask permission for using their images. And mail also acts as a cognitive proof, if in case, the creator refuses in the future and made a DMCA copyright.
Hence, use the above means and avoid any conflicts related to copyright.
With this, we fished our first major parts of SEO Image Optimization. Now let’s dig deep into the next part of Image Optimization for better SEO.
Step 2: Image Optimization Before Uploading
1. Format
“Will the reader care what format of Image you are using in the post?” Definitely, No. “Will Google care about your image format?” It depends (sort of).
Wonders why? I answer ‘No’ for first and ‘it depends’ for the second question.
This is because the majority of users (99% of them), not truly care about image format unless the image content is clearly visible.
This answer might obsess some of you. But the truth is, “no one does care” unless you are running a photographic website (as for the majority of users, details matter) and other exceptions like users with poor internet connections.
So, in answer to the second question. “Will Google care about your image format?” It depends.
For explaining this question, take two scenarios (you commonly encountered). The former one is ‘hosting problem’ and the second one is ‘search intent’.
In a slow hosting, a png image loads slower as compared to jpg—due to the larger size of png than jpeg/jpg—that overall hurts page speed and the SEO ranking.
While talking about the Search Intent, if a user searches, for example, “cats png”, crawlers have to find png images on the entire web and here the format of image matters. This is also true for other formats like ‘cats jpg’, ‘cats gif’, and so on.
So, if you are developing an image downloading website then you should format your images based on the user’s intent otherwise stick to jpg format.
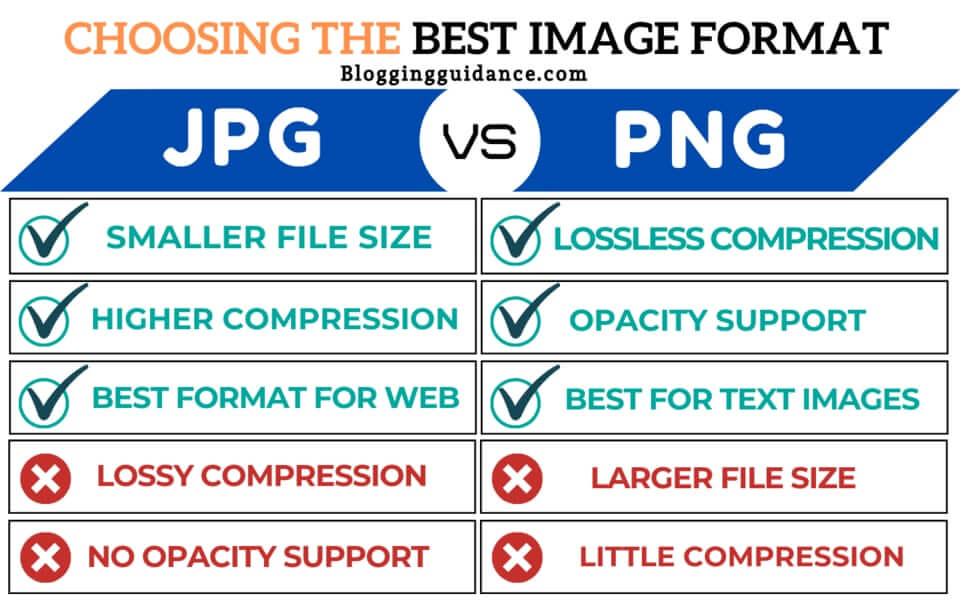
Have this golden rule for optimized Image Format: Never upload a png image unless you have a very specific goal i.e. colorless background image, text images or fulfilling search intent (that we discussed earlier).
Before introducing you to the size and dimension optimization, my best-recommended PNG to JPG converter web tool (or any other format) is ezgif.com.
2. Image Size, Compression, and Scaling
Our main goal of resizing and optimizing the image is to boost the page speed without jeopardizing the image quality.
Before describing the real process of optimizing the image, the major question that users ask is “What would be the perfect width of an image?”.
To answer this, I would say, it truly depends on your website layout. And if you are not using correct dimensions of the image, you surely add extra kilobytes of data that even your website doesn’t need.
It is also reflected as ‘Serve scaled images’ in GTmetrix and google page speed.
Note: A Serve Scaled Images are the images that are adjusted to match the dimension of the website i.e. scaled down to the dimension of the website.
“Don’t worry”, I will show (later in the post) how you can get rid of these problems permanently.
For this, you can either use ‘Inspect’ (recommended) or a browser extension named ‘View Image Info’.
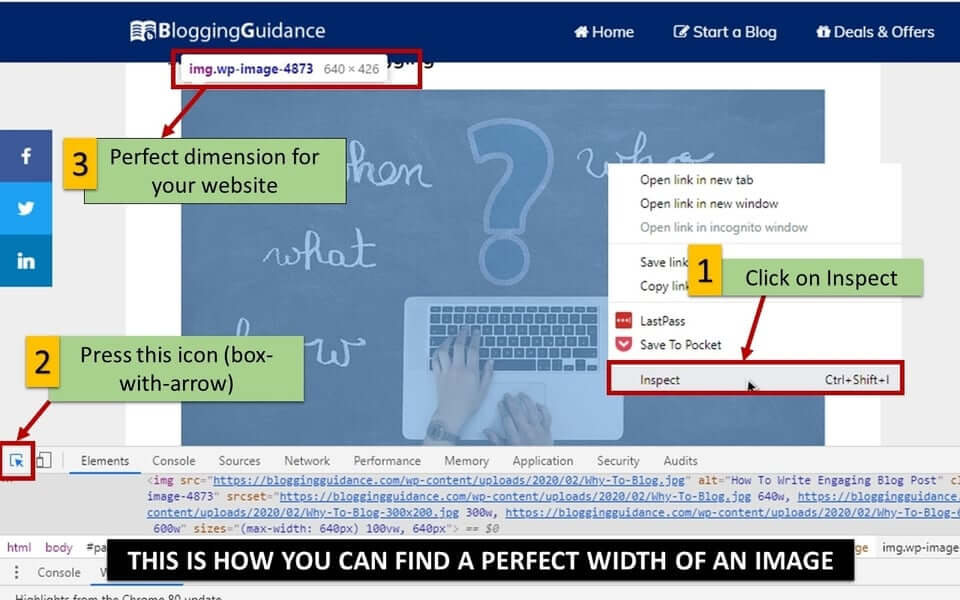
Finding a Perfect Scale Size using Inspect Feature.
- Hover to a full-scale image from any post.
- Now either you can use “Ctrl + Shift + I” or right-click > Inspect.
- Press the ‘box-with-arrow’ icon or type “Ctrl + Shift + C”.
- Now again place the mouse pointer to the image.
- And you will get perfect width (in px) of your image.
This is how it practically looks like.
But if you don’t want to use the Inspect feature, you can use the View Image Info browser extension. In this, you just have to install it and right-click on the image and you get your image dimension.
From now, you know what should be the perfect dimension of the images for your website. Now, its time to do some practical work.
Four Fundamental Parts of optimizing an Image
So, here we are, the crafting part which seems to be tedious but actually the most enjoyable section of SEO Image optimizations. These are cropping, resizing, resolution, and finally the compression.
a. Cropping
The very first thing you do with images is to ‘trim it down’. It is not necessary you have to crop-up all the images but cropping an image will lead to the smaller file size that ultimately a good thing for any website.
For cropping, there are numerous options. You can either use your smartphone’s image editor or any other cropping tools.
My two favorite cropping tools are photoshop (offline) and resizeimage.net (web tool).
b. Resizing
Before digging deep in resizing, let me first clear the misconception that exploits many of the bloggers i.e. the resizing and cropping are the same. Actually, they aren’t.
Cropping is just like “cutting your head from the body” while resizing means “hammering you down to make you small in stature.” I am sure you understand my explanation.
This is how resizing helps in reducing the image’s size.
So, how can you resize an image? For resizing, I use photoshop and resizeimage.net web tool. And I believe these tools are more than enough for the majority of your work.
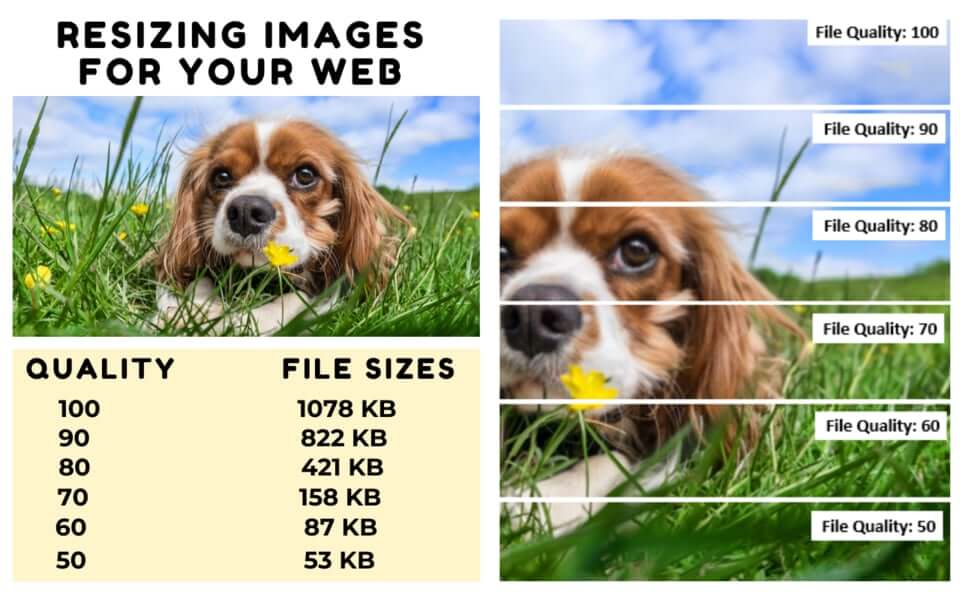
To show you how a resized image looks like, let’s take an example.
After cropping, you uploaded an image of resolution 2500 x 2500, but your content width is small, say 750px, then the website with srcset enabled makes the image scaled down from 2500px width to 750px width while keeping the aspect ratio same.
Therefore for better SEO Image optimization, you can scale all images to a max of 750px width.
Note: srcset, is responsible for displaying images based on the viewer’s display that might be your desktop monitor or mobile screen. In other words, you can say, srcset is bound for displaying responsive images to users.
A pro tip for you guys, don’t make your image distorted by scaling both the width and length. So, you should only scale down the width of the image, and the length will automatically adjust as per the respected aspect ratio.
c. Resolution and Image Quality
Decreasing the resolution doesn’t hinder the quality of the image (to some extent). What?
It is because desktop monitors and other electronic displays generally have a web-friendly resolution—72dpi and 92dpi. Hence, if you publish an image with 300dpi—common dpi for printing photos—the monitor has to compress it down to display at 72dpi.
So, “Why use an image of 300dpi when 72dpi is enough?” That’s right, you shouldn’t unless you’re building an image downloading website.
By the way, for resolution optimization, I only rely on photoshop.
However, imageresize.net is also a handy tool but it doesn’t give the options to play with dpi. Although, while using imageresize.net, you can skip this step, as it automatically optimizes your images with web-friendly dpi (72 dpi).
And that’s all. In short, image resolution (higher dpi) is the quality factor for printing on paper, not for the post’s web images.
So, there is no need to add a higher dpi picture to your site.
d. Image Compression
Image Compression is the no-way-to-skip step if you truly want to optimize your images for SEO points of view.
There are various tools and plugins that make this task slightly less painful.
Image Compression Using Plugins
When you are building a website from scratch, you should probably stop using image optimization plugins. However, if you have a lot of images on your website or don’t have time then you should go for plugins.
Some mostly exotic WordPress plugins that did their job very-well are
- ShortPixel (Top recommended)
- Imagify
- EWWW Image Optimizer
- Smush Image Compression and Optimization
Image Compressing Tools (What I use)
Why am I personally not using plugins? Because plugins take server space and might increases the server load.
That’s right, they do. So, if you have time, it’s better to stick with (off-site) tools to compress your images.
As you know, there are two formats i.e. PNG and JPEG that are commonly seen on the web. And for their compression, you can use:
- For compressing a PNG image: TinyPNG and Compress PNG.
- For compressing a JPEG image: TinyJPG and Compress JPEG.
All these above mentioned fundamental parts are—what I personally use for each image and what you should also follow in order to get an SEO optimized image without compromising, too much, on quality.
Now, the very next step is to state a relevant name for your image.
3. Relevant Image File Names
Before uploading, you should name your image file with relevant names. Yeah, this is the last step before you upload the picture to your website’s gallery.
For illustration, let’s have an example. An image shot by mobile has a name IMG2020_01_01. This doesn’t imply what inside the image.
So, in order to get a better understanding of the image’s content, you should revise its name to some meaningful title.
For example, if I have to make a graphic on “Best Cloud Hosting Providers with 1 Year Free Trial” then I named the image file to be ‘Best-Cloud-Hosting-Providers’.
By doing this, it serves two goals.
- You can search image in your computer by some keywords in a few clicks, and other is
- You matched the intent of what the graphic represents.
Also, have a look at these tips for naming your image file.
- Avoid special characters like *, ^, &, #, @, etc.
- Use dash instead of black spaces.
- Try to use small alphabets without numbers (except if you want to
add dates or years) - Use shorter name string (32 charters is more enough)
Congratulations! We together, come a long way to optimizing an SEO image.
It’s time for doing on-page Image optimization.
Step 3: On-Page SEO Image Optimization
For many of you, on-page SEO image optimization is well-known. And many users think this could be easy and can be done in a few minutes.
But there’s more.
I will share some uncovered facts while doing on-page SEO image optimization. Let’s find out what the majority of you guys are avoiding while doing on-page image optimization.
1. Alignment
Alignment can be called as the ‘adjustment’ of the uploaded image with the text.
There are three basic alignment settings that are Left align, Center Align and Right Align. However, in WordPress, there are two additional alignment settings i.e. wide width and full-width alignment.
Alignment and their General Application
A. Full Width: In this, images are stretched to the complete width of the browser’s window.
General use: As a background Image
B. Wide Width: Images are stretched to the width of the content box.
General Use: As a first Image of the post.
C. Left, Center, and Right Align: They make the images appear to their respective side.
General Use: Based on the blogger’s preferences.
While talking about my views on alignment, I majorly use wide width and center alignment. And few times left and right alignment.
“Why?” I, in the first place, avoid left and right alignment. Because they can bite you (Just kidding). The reason is, in the mobile view, images hinder with the text and they look junky even they look amazing on the desktop.
However, as per my memory, I had never used ‘full width’ alignment. As it looks creepy to me, and again this is my personal thought.
What do you think? Comment! what alignment you prefer to use in your blog images.
2. Captions
Captions are kind of an image’s description which addresses any explanation that the writer wants to imply. They are generally out-ranged by search engine’s crawlers.
So, Why is it an important component of SEO Image Optimization? This is because it can generate a clear understanding to the readers which again leads to more engagement that increases the average session time of your website.
That’s in-sum leads to higher user experience. And that’s what Google is always looking for.
In short,
Image with Captions = clear understanding = more engagement = higher avg. session time = higher user experience = higher ranking.
Hence, the image’s caption, not directly, but indirectly affects your site’s SEO. So, it’s better to use image captions.
Someone asked me once, “Should I use captions for every image?”. My answer, try to use them, but not that much necessary as alt text (which is our next topic).
3. SEO-Friendly Alt Text and Title Tags
“SEO friendly Image’s alt text is a positive sign of a higher ranking of the post.”
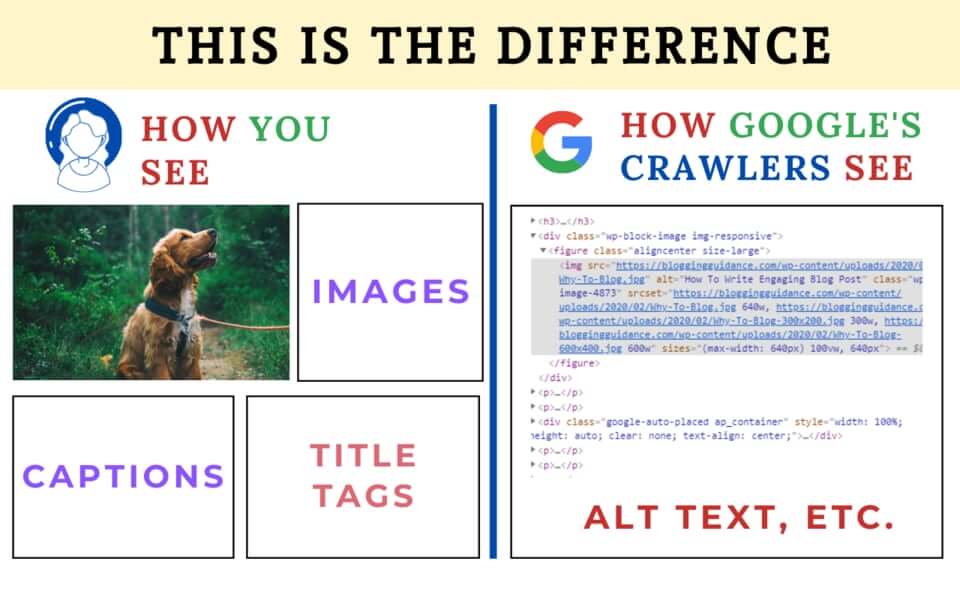
It’s so true. There is too much advancement in technology, but still, search engine crawlers are unable to ‘see’ an image just like you see.
And here comes the role of alt texts. Alt text led crawlers to specify what the content of the image is associated with.
Therefore, every image that is shown in the search results has a string of an alt text. This means, with proper alt tags, your post’s images have higher and only chances of ranking.
What are the best ways to optimize the image’s alt text for better SEO? Follow these pointers:
- Be short and crisp.
- Specifically describes what your image compiles.
- Avoid too much keyword stuffing.
- Avoid using phrases like “image of”, “photo of”, etc.
- Don’t use special characters and emojis.
You’re now wondering, “what is the role of title tags in on-page SEO image optimization?” They have nearly no use.
And in the general case, most professional bloggers also don’t use them. However, some of them use the title text the same name as alt tags. But practically, they are different.
So, why the heck is the option of a title tag in WordPress?
They are generally employed in the case when you want to add more information to the images so when the user clicks on photos it will appear.
They generally matter when your pages have less written content than images (like photo downloading websites).
Now, it’s quiz time.
If you ask me, “Should I use title tags in images?” I must say if you have time then take this extra advantage. And if you ask me, “Whether or not I use title tags in my post?” My straightforward answer is, “I stop using them”.
4. Optimized Images for Social Sharing
Here tactic is different.
Here, the picture quality matters the most. That’s why you should optimize some images not for SEO but for social sharing.
Our main goal here is to create lovable images that are sharable which can only be achieved by higher quality and glossy images.
If you use Facebook daily, you inevitably notice various website links with fascinating images. And that is a good example of an optimized image for social sharing.
There are a bunch of plugins that can make this sharing work easy for you. The most recommended one is the Yoast as they have a dedicated section of social sharing.
Apart from this, if your main audience is from twitters, (news-related websites) you should try Twitter cards.
5. Image Structured Data
So what’s the heck here? It’s simple.
If you search “protein powder price” and hit enter. There is a bunch of structured data (have a look at the following image)
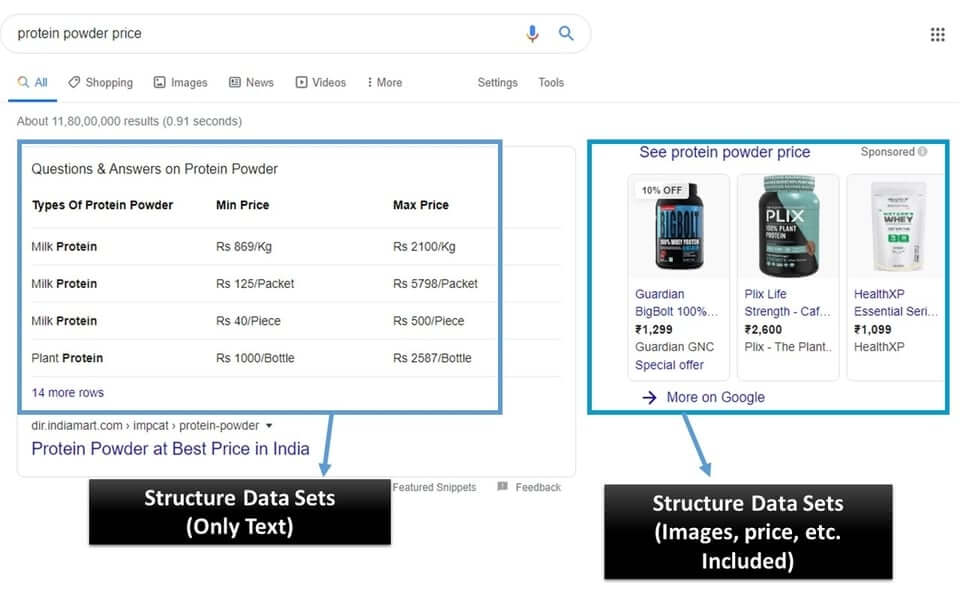
On the left, you see the featured structure data, and on the right, you can see the products with images, prices and respective names.
So, this can only be achieved when you have a structured data format not only for pricing but also for the images.
The most commonly encountered image structure data tags are product, video, and recipe.
Therefore, if you have an e-commerce site then it’s better to starts using image structure data. As they are crucial for it.
Otherwise, if you are using a normal blog website then most of the work is done by the SEO optimized plugins like Yoast and RankMath.
The following image shows how image-rich snippet looks like (by Yoast)
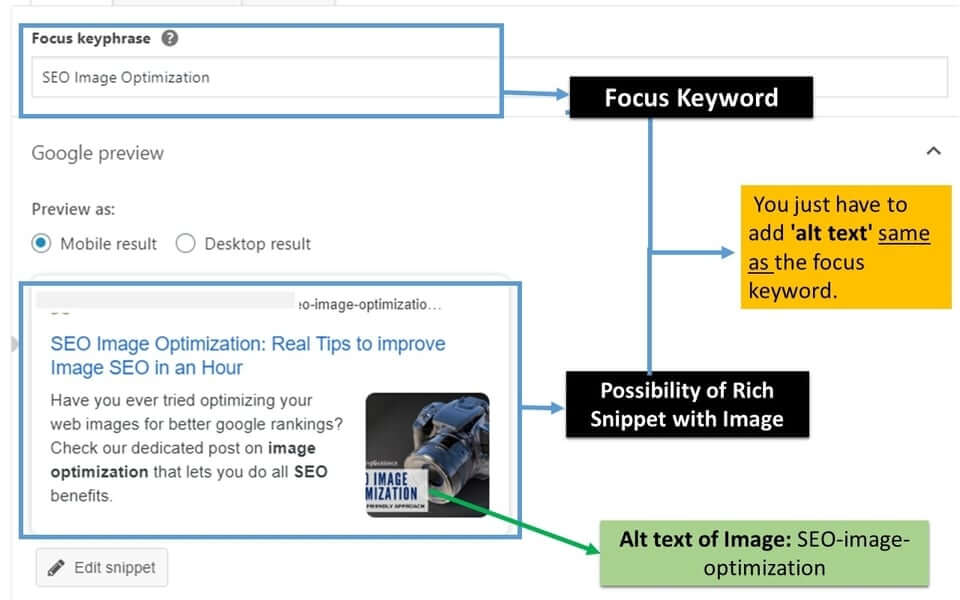
To get a result like this, you just have to add ‘alt text’ as same as the focus keywords.
With this, we are almost at the end of our ‘basic to advance’ mission of SEO image optimization.
But Wait! I have two bonus tips for you.
Bonus Tips that Ease you in SEO Image Optimization
1. Use Lazy Load Plugins
In this rapidly-changing world, websites with lazy image load slash their server load by many times. This is done by preventing the loading and rendering the images that are below the visible user area.
This not only optimizes the web page performance but also decreases the initial request to the server by a web browser.
Altogether, using Lazy load to optimize your web pages will eventually cut the crucial initial load on the server.
Hence, in your bucket of plugins, you should have a lazy load plugin.
In the WordPress industry, there are a bunch of plugins but I stick to Wp Rocket (paid membership), which has an inbuilt lazy load feature. But if you want a free lazyload plugin, you can use Lazy Load – Optimize Images.
2. SEO Image Optimizer Tools (All-in-one)
Now, It’s time to demonstrate how to optimize an Image, SEO friendly.
In this demonstration, I use two of my favorite tools, one is Photoshop, and the other is resizeimage.net.
This is relatively a quick demonstrations for you guys. But I try to make it as informative as possible.
So, Let’s begin with photoshop.
A. Offline Image Optimizer Tool—Photoshop
a. Image Cropping using Photoshop
Follow these simple rules and you are good to go.
- First, open the image which you want to crop.
- Select the Crop Tool from the toolbar.
- Scarp-out the desired area.
- Hit enter.
You can also crop the image by the aspect ratio.
b. Resizing and Resolution Adjustment
All these settings are easily done in a single window. Just follow the guidelines.
- Open the cropped image (or any image)
- Now hover to Image section.
- Now, in the menu, select ‘Image Size’ or press ‘Alt + Ctrl +I’.
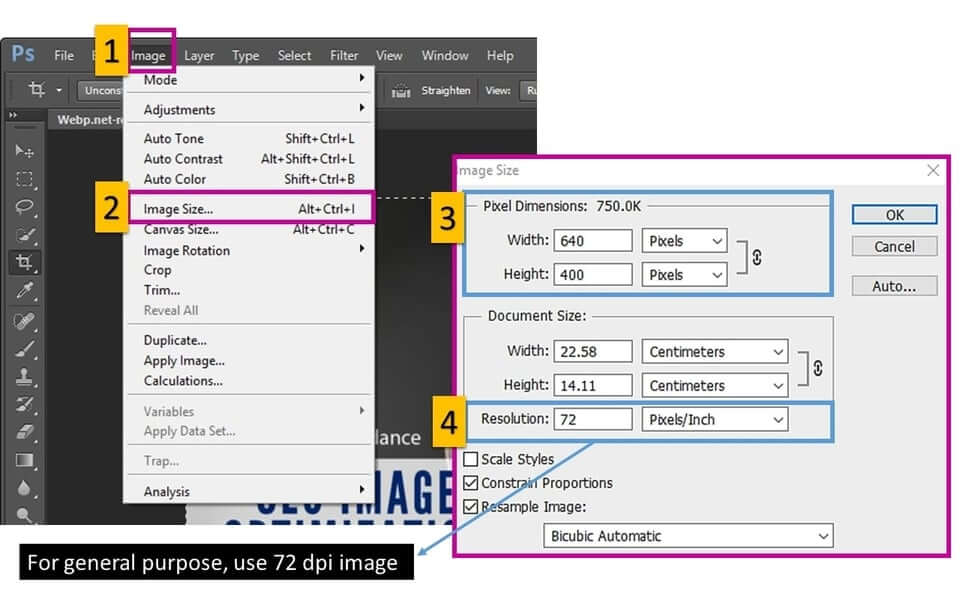
In this window, you can play with the image resizing or called pixel dimension.
I personally only work with the Pixel dimension as it is easy to remember, say 750 px, equals to 10.41 inches (for 72 dpi screen).
And in the same window, you can also adjust the resolution of your image. And for better image optimization try to adhere with 72 dpi resolution.
c. Compression and Format
To compress your image using Photoshop, you just have to use the “Save as” option.
- Click on the ‘Save as’ option.
- Choose an appropriate format (try to use JPEG) and click on the Save button.
- Now in the new window of ‘Image Option’
- In the Quality tab, set the value to be 5.
- And in ‘Format Options’, select ‘Baseline Optimized’
- Finally hit the save tab.
And for the users who don’t want to use photoshop can try my top used web tool i.e. resizeimage.net
B. Web Tool—ResizeImage.net
Personally, I use resizeimage.net from last one year. I would say, this would can somehow catch-up with the general optimization done by Photoshop.
This tool provides you with options like crop, rotate, resize, format, and optimize-level.
So let me explain how you can optimize your images easily using this handy tool.
1. Upload the image: Here you can upload any format of image files.
2. Crop: If you want to crop, just select the desired area. And click the Crop button. Here, you can also trim the photo down based on the fixed aspect ratio.
3. Rotate: You can also rotate your image here.
4. Resize: In this option, you can resize the image based on your specified size (in px) or also by percentage.
5. Make Background Transparent: Helpful feature for removing noise background color from an image.
6. Select the output image format: There are four variants of exported image format. These are JPG, PNG, GIF, and BMP.
7. Optimize your image: This is the heart of this web tool. From this, you can choose from ‘best quality’, ‘normal compression’, and ‘Progressive compression’. But I suggest you, to use “normal compression” with a quality score of 70-85%.
And here, our topic is finally ended. But, not the post. There is much more.
SEO Image Optimization: Full-Proof Summary
So, from now, you get to know, there is much more in SEO image optimization than just uploading the image on the web.
At last, here is a quick short procedure so that you never forget the perfect recipe for furnishing images for your website.
Step by Step Procedure for using an SEO Friendly Image
- The Creation Process
- Relevant Images
- Use free services (Try to use as minimal as possible), or
- Make your own
- Be Aware of Copyright
- Image Optimization Before Uploading
- Use the right format (Try to use JPEG)
- Image Size, Compression, and Scaling
- Named with a relevant name and keyword
- On-Page SEO Image Optimization
- Alignment
- Use Captions
- Use Alt Text (must for Google Rankings), and Title Text
- Optimized Images for Social Sharing
- Image Structured Data
And that’s done. But have a look at the most asked question.
General FAQ
1. Are images important for SEO?
Ans. Undoubtedly, Yes. A properly SEO optimized image that ranks in image search can bring a lot of traffic. And that’s how image-based website draws traffic organically.
2. How do I make my photos SEO friendly?
Ans. There is a lot in this. You just have to reach our summary section of this post to get a quick overview of ‘how it is done perfectly’.
3. How the size of an unoptimized image hurts the SEO?
Ans. In an unoptimized image, without on-page optimization, they fail to rank in google. So, no traffic.
However, if your image is on-page optimized still loads slowly then, in the long run, they not only alter the ranking but also consume unnecessary server resources.
4. How to know what is the correct dimension for your website?
Ans. Just pick a full-scale image from your old post. And press ‘Ctrl + shift + C” and move your mouse’s pointer to the image and you will get the correct dimension for your web.
If you liked this article, then please share it to the social networking site. You can also find us on Twitter,Facebook and Instagram.