Do you ever think of starting your own blog and searching for How To Start A Blog?
If yes then you are in the right place. Here we are sharing the complete tutorial on How To Start A Blog In 2020 from scratch.
In this article, we will cover all the information starting from basic to advance on How To Start A Profitable Blog.
So first take a look at what we are covering in this article. You can jump to any section of the article by pressing the desired link.
Before moving to the detailed information let’s discuss What Is Blogging?
What Is Blogging?
A blog is a medium for sharing knowledge with others. That knowledge may be some information or some problem-solving ideas or anything else.
And the process we follow to making a blog and maintaining it is called Blogging.
A blog is not the platform to share only knowledge but you can also make huge money by blogging. Don’t worry. we are going to tell you all that.
Why Should you start a blog?
Do you know that blogging can change your life? Yes! There are many professional bloggers who earn millions from blogging.
You can also do that.
If you have a passion for something then you can make money by blogging. You just need to be consistent and the result will come to you.
Here are some of the examples of professional bloggers who earn millions by blogging.
Neil Patel
Neil Patel is the founder of neilpatel.com and drives more than 7 million visitors per month. By which he makes a great amount of money.

Harsh Agrawal
Harsh Agrawal is a professional blogger from India. He owns www.shoutmeloud.com and some other blogs.
Harsh earn huge money from his blog and shares his earning report every month in his blog.


Become Your Own Boss
Harsh Agrawal
Founder, shoutmeloud.com
So there are many bloggers who earn millions from blogging.
There are some basic reasons for blogging. Some of them are:
- Making Money
- To Get Popular
- Sharing your knowledge
- Social impact
- Expressing your thoughts
- To Get Review Units
- Etc
Some people make a blog just because to earn money while some want to get popular. But there are peoples who blog to share their knowledge.
So there are many reasons behind starting a blog. In this article, we will guide you on How You Can Make A Blog for your business or interest.
7 Steps To Start A Blog
You just need to follow these 6 steps to start a blog in 2020. This is just an overview of how to start a blog. You can read the full description by clicking read more.
#1. Find A Perfect Niche
Before starting a blog you need to choose the Niche first. Niche means the topic of your blog. In other words, Niche refers to the topic in what you are going to write on your blog.
So the first thing to consider before starting a blog is to find a perfect Niche for your blog.
Don’t worry, we will help you to find the best niche for your site. You can find the perfect niche selection technique below.
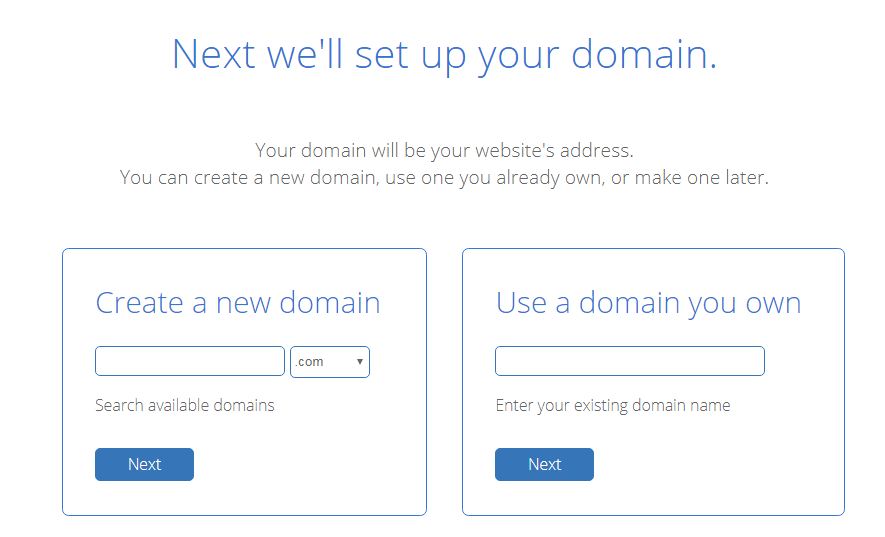
#2. Pick The Perfect Domain For Your Blog
The domain name is the address of your blog. So choose it wisely. A wrong domain name can hurt your blog badly.
Choose a domain name that is related to your blog, short and easy to remember.
This will help your visitors to remember your blog easily and this improves the chances of returning those visitors.
So picking a perfect Domain for your blog is the most essential part before starting a blog.
#3. Choose Your Blogging Platform
There are many platforms using which you can set up your blog. Choosing the best blogging platform is the most important decision to make as a blogger.
Both free and paid platforms are available for making a blog. But here we will tell you what platform to select for your blog.
In this article, we will discuss both the free and paid blogging platform in detail so that you can choose the best one. If you need to know about the best blogging platform right now, read the complete article.
#4. Setup Your Blog
After choosing the blogging platform for your blog it is time to set up and customize your blog.
This is the most important part of starting a blog. Your blog needs to be the best in design to attract visitors.
In this segment we will discuss:
- Basic Blog Design
- Creating Menus For Your Blog
- Customizing Your Blog Design/ Installing Theme
- Adding Plugins
- Changing Your URL Structure
- Some useful settings
#5. Publish Post On Your Blog
A blog is nothing without any post. So after designing and setting your blog, you have to publish a post on your blog.
Writing a blog post is not that easier you think. You cant suppose to write anything on your blog post.
Always, write a blog post related to your niche. Don’t worry, we will show you how to write a perfect blog post related to your niche.
For that, you have to read the “How To Write A Blog Post” section.
#6. Promote Your Blog
Creating a blog is not the only thing if have to do if you earn money form that. You have to promote your blog to get visitors.
There are many ways to promote a blog such as SEO, Paid Advertising, Social Share, Email Marketing and others.
You can use those to drive traffic to your site and convert those traffic to money.
So you have to promote your blog with all the available methods to earn money.
In this article, we will cover all the procedures to promote a blog.
#7. Monetize Your Blog And Earn Money
If you have all done. Now its time to monetize and earn money from your blog. This is the main reason why people want to start a blog.
There are many ways to monetize your blog and earn money from that. If you have a good amount of traffic then you can make huge money from blogging.
Some of the Monetization Method:
- Google AdSense
- Affiliate Marketing
- Promoting Your Own Product
- CPA Marketing
- Etc
These are some of the monetization techniques you can use to earn money from your blog. We will discuss later.
Now Its Time To Know The Detailed Guide On How To Start A Blog
How To Start A Blog In 2020 From Scratch?
Above we gave you a snapshot on How You Can Start A Blog and what is needed to make a blog.
Now its time to go deeper. We are not here to give you just the basic knowledge of starting a blog.
Here we will cover all the parts of making a blog starting from Niche selection to Monetizing your blog.
We assure that you don’t need to go anywhere and search for “How To Start A Blog” after reading this post. It will give you all the knowledge.
So let’s start the journey.
Find A Perfect Niche For Your Blog
Choosing the Niche for your blog is the most important part. Before selecting any Niche you have to do deep research.
That means you need to follow some rules while choosing your Blogging Niche. After that start your blog.
But before finding a Niche for your blog, Do you Know The Types Of Blog?
Yes! There are many types of blogs. But you have to decide which type of blog is best for you.
Types Of Blog:
- Static Website
- Multi-Niche Blog
- Single-Niche Blog
- Micro-Niche Blog
These are some types of blogs you can make. There are other types of blogs also but these are the main Niche. You have to choose one of these bases on your niche.
Static Website:
It is a single-page website mainly focuses on a particular service. It is the easiest website to make but you need some coding knowledge to make it. There are also many tools available to help you make these types of sites.
Multi Niche Blog
A multi-niche blog covers all types of topics and not limited to a single niche. For example our own site Veewom.com. It contains all the topic such as Blogging, Digital Marketing, Tools, Tutorials, etc.
Single Niche Blog
These are the types of websites that focus on a single niche. For example http://ecustomercare.us/. On this website, we only focus on Customer care information based in the USA. Nowadays these types of sites are very popular.
Micro Niche Blog
It is a type of website focused on a single keyword and all the contents of the websites revolve around that particular keyword. You fave to find a keyword with a huge search volume and make a site on that. In this type of website, you have to work for only a few days. Set up your site, rank it and earn money with Google Adsense.
So above are some types of blogs you can make.
What To Consider While Choosing a Niche?
Blogging is all about writing that topic in which you have an interest. It is not a short term process as you have to write blogs for years.
So always choose that topic which you are passionate about. You have to know everything about your Niche so that you can write a detailed blog post.
Always choose the topic in which you have an interest and can write for longer. It will help you to get success, happiness, and social recognization.
This will also help you to differentiate yourselves from others and your competitors. So always choose a Niche you have a deep interest in.
In this article, we will help you to choose the perfect Niche and also show you How To Start A Blog using that Niche.
#1. Think What You Can Write Without Getting Bored
This is the most important step while choosing your blogging Niche. In this step, you have to evaluate all the topics that you love to speak, write, and read.
By thinking deeply you can discover hundreds of ideas for making a blog. But you have to choose the best one.
We recommend you to take a pen and a paper and write down all your interest that may be personal or professional.
Think About Your Hobbies
Here you can find the best blogging Niche related to your hobbies. Just think about those that you like to do in your leisure time.
Or start thinking about those things you could do for hours without getting bored.
For example, you have an interest in painting and you can paint for hours without getting bored then it could be a great blogging Niche for you.
You can write posts related to painting and give tips to others related to painting.
Your hobbies could be the best Niche for starting a blog.
What You Like To Learn
The best thing about blogging is you can share those stuff that you are learning.
So try to find what you want to learn and also can teach others. This will help you to find the perfect Niche for your blog.
For example, if you have an interest in photography and want to learn that. In that case, you can start a blog on photography and share all the knowledge you learn.
This will improve your knowledge of photography. On the other hand, you can manage your blog also.
Make A Blog On The Topic In Which You Are Expert
Every people have some fields in which they are expert. So you also have some field in which you are an expert.
If there are topics in which you have great knowledge then it could be the Best Niche For Your Blog.
For example, if you are a math teacher who loves to teach math. Then you can start a blog based on mathematics where you can share all the techniques of solving math problems.
You will never get bored by doing this as this is the topic in which you have expertise.
This will also help to improve your social presence.
By applying the above methods you can identify your blogging niche easily. It will give you a clear direction about your interests.
But following the above rules is not the only thing to consider while choosing your Niche. There are many other things you have to look for if you really want to make money from your blog.
#2. Niche Potential
The success of your blog totally depends on your Niche selection. If you are making a blog then we think that you also want visitors to come to your site.
In that case, choosing the Niche which has no search volume is meaningless. Here you ask What Is Search Volume?
What Is Search Volume?
Search volume is the total number of searches made for your niche on a monthly basis. It will decide whether your selected Niche is profitable or not.
Now let’s talk about the potential size of your niche and how to find it.
A. Potential Niche Size
If you have found a great Niche idea and thinking of starting a blog on that wait for some time. Because before starting a blog you have to verify the Potential of that Niche.
This means whether the Niche selected by you is profitable or not. Unless you may have to face difficulty while managing and ranking your blog.
So always select that niche which is not too small or too big.
For example, the size of the “Cricket” niche is too big and broad with millions of keywords ideas. So making a blog on cricket Niche is not going to work for you.
In the same way, choosing a Niche that has less search volume will not going to give you success.
So choose a niche that is not so big or not so small such as “Cricket Bating Tips”.
This is a great Niche with good search volume and less competition. (We are taking an example, it does not mean that you have to start work on this niche).
How To Check Niche Size?
For checking the size of your niche, you have to use Google Keyword Planner. It is a free tool by Google that provides many accurate data as compared to others.
Also, you can use Ubersuggest, a free tool by Niel Patel that helps to find search volume and competition of a keyword.
Using Google Keyword Planner you can find great keywords idea but it won’t give you the exact search volume of a keyword.
But Ubersuggest will give you the exact data(sometimes it varies) on the Niche you are searching for.
So, we suggest you to use the Google Keyword Planner Tool to get keywords ideas and Ubersuggest to get average search volumes for specific keywords.

Always choose your Niche with a minimum of 10000 search volume and not more than 100000 as a beginner.
There are many paid tools available in the market. But as you are going to start a blog we recommend you to use the free tools first.
These tools are free does not mean that it does not give accurate data. We will discuss the paid tools later.
B. Potential Competition
If there is a competition in your niche than it is clear that people are working on it and it is profitable. In the blogging field, you have to make friends for interchanging backlinks.
So take your competitors as your friend as you may need to take a link from their site that will help you to improve your site’s authority.
How To Find Your Potential Competition?
Searching On Google
You can directly put your niche on google and see the search results.
Also, you can search for “[niche name] blog” or “best [niche name] blogs.” and see the results.

You will find many blogs working on your niche. Don’t be afraid. It is a good sign that people are working on your Niche.

Search On Facebook
Facebook is the largest audience network around the world. So it is always a wise decision to search your blogging niche on Facebook.
It will help you in Niche selection if you want to start a blog.
Go to facebook and search for pages and groups related to your niche. If there are pages having a minimum of 1000 followers then your selected niche is great.

Search On Twitter
Twitter is also one of the widely used social media platforms. You can also find a niche idea using Twitter if you want to start a blog.
For that go to Twitter and search for your niche. You will find twitter accounts related to your topic. Just check them and observe what they are sharing.
If some of those Twitter accounts have more than 1000 followers then your niche is good enough to start a blog.

These all are the platforms to check the Potential competition of your niche. Always choose a niche that has more potential.
C. Potential Monetization
Do you want to start a blog that generates money for you? If yes, this section is for you.
But if you want to make your blog just because of your hobby then we advise you to monetize your blog.
There are many people earning thousands from blogging. So why not you?
If you want to make money from your blog then your niche does not matter. If your niche satisfies the above three steps that are: Google, Facebook, and, Twitter then you can make money from your blog.
How To Know That Your Niche Is Monetizable?
- You can know this by applying the above three steps. Search on Google, Facebook, and, Twitter and see that is anyone selling information or products related to your niche?
- Search for affiliate networks related to your niche.
- If none applies, there are many ad networks like Google AdSense and Media.net who provides ads service for your blog
- You can place ads on your blog and earn money for every click.
#3. Make Your Final Decision
After doing all the research and validation process now you have a clear idea about your niche. Now you know the size, competition, and monetization potential of your selected niche.
If all the above steps satisfy then congratulations, you are ready to start a new blog.
So now its time to move forward that is selecting the best domain for your blog.
Domain also plays an important rule in a successful blog. Don’t worry, We are here to help you find the best domain to start your blog.
How To Choose A Perfect Domain For Your Blog?
After finding a Niche to start your blog the next thing you need is a Domain Name. Choosing the right domain name is the most important part if you want to get success in the blogging field.
A wrong Domain name can hurt your website badly and after that switching to a new domain is very hard.
So batter choose the Perfect Domain for your blog at the starting point. It will surely help you to get success.
So in this section, we will guide you on How To Choose A Perfect Domain Name For Your Blog according to your niche and where to register that.
What Is A Domain Name?
A domain name is your website name. The domain name is an address where Internet users can access your website. A domain name is used for finding and identifying computers on the Internet. Computers use IP addresses, which are a series of numbers. However, it is difficult for humans to remember strings of numbers. Because of this, domain names were developed and used to identify entities on the Internet rather than using IP addresses.
Tips for Choosing The Best Domain Name
If you want to start a blog then the most important part is to choose the best domain for your niche.
Here we are sharing some great tips which you have to consider while buying a Domain name.
- Always Go With.Com Extension
- Include Keyword in Your Domain Name
- Keep Your Domain Short
- Choose A Domain That Is Easy To Pronounce And Spell
- Make It Unique And Branded
- Always Avoid Hyphens In Domain
- Avoid Including Double Letters
- Leave Room To Expand
- Well Research
- Use Domain Name Generators
- Take Quick Action And Buy Your Domain
- Best Place To Buy A Domain Name
Above are the best practice while choosing a domain name for your blog. Let’s discuss this in detail.
#1. Always Go With .com Extension
Nowadays there are many domain extensions from which you have to choose one. Always remember that your domain is going to be your brand name. So choose it wisely.
We always suggest you select a .com domain extension if you want to start a new blog as it is the most trusted domain by users.
There are many attractive domains that are provided by registrars but King Is Always King. So choosing a .com domain is always the best practice you can do.
Dot-com domains are easy to remember and people have trust in .com extension as it is the evergreen domain extension.
For example, bestcricketbettingtips.com is more trustable than Bestcricketbettingtips.pro or Bestcricketbettingtips.website
So why to take a risk by choosing other extensions. Just go for .com and stay tension free.
If you are starting a microniche site, in that case, you can use other extensions. But we still recommend you to go for the .com domain if available.
#2. Include Keywords in Your Domain Name
Including keywords in your domain name tell the search engines what your website is about. So always try to include keywords in your domain.
Keywords inside your domain name can attract more users and increase the chances of getting clicks. It will improve CTR which helps to rank higher.
But getting your dream domain with your keyword is very difficult. So you have to be very smart while choosing a domain name.
If your required domain is already taken then you can add any helping word with your keyword.
For example, our selected niche is Cricket Betting Tips and cricketbettingtips.com is already taken. In this case, we can use Best or Top before our domain.
That is Bestcricketbettingtips.com or Topcricketbettingtips.com
This makes your domain name easy to remember.
#3. Keep Your Domain Short
It is very important to keep your domain short and memorable. Including keywords in the domain do not mean that you can choose a long domain name.
So always try to choose a short domain that reflects your niche. It will help you to rank higher in search engines.
Using a domain with a maximum of 15 characters is always recommendable. Above that, it is hard to remember that it will harm your site.
It is a fact that users are very lazy and avoid to type a long domain name. So try to choose a domain that is short and easy to remember.
#4. Choose A Domain That Is Easy To Pronounce And Spell
While choosing a domain name always remember to choose that domain which is easy to Pronounce and Spell. It will make your domain to remember.
Choosing a simple domain which is easy to read and write is always helps you to build your brand. It also sounds smooth to listeners.
Easy to read and write does not mean that you should choose a long domain. Always choose a short domain that is easy to pronounce and spell.
#5. Make It Unique And Branded
Choosing a unique domain name helps you to build a brand. So try to choose a domain that is different from others and looks branded.
It will help your readers to remember your domain so that they can visit your blog by directly typing your domain.
Choosing a branded domain does not mean that you are allowed to choose a domain with registered brand names.
For example, you can’t choose a domain having Amazon or Alibaba in it as these are registered trademarks.
You will get copyright strikes for using other trademarks. It will harm your site.
#6. Always Avoid Hyphens In Domain
Using hyphens in the domain indicates that you are spamming. So never try to use hyphens in your domain.
It is also not good for SEO as it makes a negative impact on your visitor. Visitors think that your website is not genuine and never clicks on it.
If your required domain is already taken then use any supportive word before or after your domain but never use hyphens.
#7. Avoid Including Double Letters
If you want to make your blog branded then you must avoid using doubled letters in your domain. There is a chance of losing traffic by using double letters.
For example, never use bestcricketbettingtipps.com as your domain.
#8. Leave Room To Expand
Always choose a domain that reflects your niche and broad enough. As you are going to post many blog post your domain should be broad in nature.
For example, if you choose Cricketberringtipsforbeginners.com then it is limited to beginners. After some time, if you want to share knowledge with other users also then it might prevent you from attracting readers.
So before choosing a domain name always ensure that it is broad enough.
#9. Well Research Your Domain
When choosing a domain name always check if there is already a registered business using the same name. If yes, then leave that domain as it may face problems in the future.
Now you have a question that“How To perform A Trademark Search”?
It is very easy. Go to a Trademark search page and check your domain.

Click on Search our trademark database. Enter your domain name and click on Submit Query.


Now you get all the results.
The easiest step to know whether a keyword is a registered trademark or not is to search on google. If big brands showing in search results then it is a Registered Trademark and you should avoid working on it.
You can also register your trademark after successfully running your website.
#10. Use Domain Name Generators
Finding a great domain is not an easy task as there are already 400 million registered domain names. This makes it hard when finding a domain name.
In this case, we use the domain name generator which helps us to find the best domain for us.
These all are free tools and you don’t need to pay anything for finding domains. So we suggest you to use domain name generators to find your domain.


You just need to find your keyword and it will give you hundreds of domain ideas. Choose one of them.
#11. Take Quick Action And Buy Your Domain
If you have a domain name idea and you want to buy it then don’t wait. Because there are thousands of domains registers on a daily basis.
So if you take the time to make your decision, your domain may be bought by some others.
That’s why always take quick action while buying domains.
#12. Best Place To Buy A Domain Name
There are hundreds of domain name registrars available in the market but you have to choose best among them.
Choosing a domain name registrar is not a difficult task. If you still find any suggestion then read our Best Domain Name Registrars article.
7 Best Blogging Platform To Start A Blog
We think that now you know about how to find a niche and pick a domain to start a blog. Now its time to choose the best blogging platform for your blog.
In this section, we will cover 9 different blogging platforms so you can get a batter idea about which one is best for you.
When you are looking to pick a blogging platform to start these are some of the things that you want to be thinking about when choosing the blogging platform.
The biggest thing is you want to make sure that it’s:
Easy To Use
The blogging platform you are choosing must be easy to use so that you can use it without any problems.
Beginner Friendly
As a beginner, you don’t have much technical knowledge to manage your blog. So choose a Beginner Friendly Blogging Platform to start your blog.
Feature Rich
Always choose that blogging platform which is feature-rich. This means you don’t need to go anywhere for any feature. Your platform should be equipped with all the features that are necessary to start a blog.
Room To Grow
You also want to make sure that it’s feature-rich or that their features are available for what you want your blog to do and then do you have room to grow?
Both in terms of the features that you need and the functionality but also you may not be thinking about earning money yet but if you want to make it earn money in the future is their ability for you to add things like advertisements on your site, affiliate marketing, and things like that.
So having all of those things in mind let’s start looking at the different platforms that you can use for your website.
#1. WordPress.org

This is the open-source software that means it’s free for you to use and it’s also free for you to contribute.
WordPress.org is different than WordPress.com and you’ve probably heard many people say just get a WordPress site up and we’ll talk about WordPress.com in a minute.
Many of the pros of WordPress.org are that you have maximum control over your site. No one will be able to shut down your site because you’re not following whatever their rules are.
The next thing is the most robust features out there anything that you think you want to do with your blog to take it to the next level whether it be adding features like a forum, membership site, e-commerce if you wanted to, that’s all available to you by using the WordPress.org platform.
There are thousands of plugins, these are the things that help you make your site do what you want it to do by adding the extra functionality.

They’re also thousands of themes both free and paid to make your blog look exactly how you want it to look.

Now coming with that maximum control over your site.
You must update your site and keep all the plugins and themes updated and you’ll also be tasked with making backups of your site.
Pros
- You can control every aspect of your website on WordPress.org
- Adding extra features like forums, online stores, and paid membership can help you to convert your blog to a money-making machine.
- Design your WordPress blog as per your choice as there are thousands of free and paid themes available to do that.
- Also, there are thousands of free and paid plugins that make WordPress feature-rich.
- WordPress helps in SEO as you can customize everything link custom URL, Tags for your post, etc.
Cons
- You need to back up your blog regularly. Some plugins are there to do it but still, we recommend you to do it manually.
- At the start, you need to learn WordPress(Very Easy).
Pricing
Using WordPress is absolutely free but you need a domain and a hosting to start a blog.
In that case, a domain can cost you around $14/Yr and host around $5/Month.
But wait, as you are Blogging Guidance reader, we have something great for you. We will discuss that later.
#2. Constant Contact Website Builder

You can make an amazing blog using Constant Contact Website Builder and its free. It is an intelligent A.I. powered website builder that helps you to create a free blog, business website and even an online store within minutes.
It has a collection of hundreds of templates that you can use to start and customize a blog. Also, is has a drag and drop feature that makes it easy to build a site.
It also contains a logo maker and photo library having more than 1 million photos and more.
Pros
- No technical skill required to start a blog as Constant Contact Website Builder comes with an easy-to-use drag and drop website builder.
- Constant Contact will host your website and it is easy and quick to setup.
- You can use their free plan that allows you to try out their services to build your site.
- Domain Name and SSL certificate is included with their paid plans.
Cons
- There are not many third-party plugins like WordPress.
- You have to choose from their own template/themes.
- Moving your site for Constant Contact website builder to other platforms is not possible or too difficult.
Pricing:

As you are a beginner you can use the free plan of Constant Contact website builder. Free doesn’t mean that you can’t make a great site.
You can create a blog, business website, and even an online eCommerce store using their free plan.
After using their free plan you can upgrade to the premium plan if you like their service. The starter plan will cost around $10 per month.
With the starter plan, you can get a free custom domain name, free SSL certificate, and 24-hour phone-based support.
There is also a business plan which costs you $20 per month that provides advanced eCommerce related features.
If you don,t want to use WordPress then you can consider Constant Contact website builder to start your blog.
#3. Gator By HostGator
Like other web hosting company HostGator has also its own Website builder call Gator. It gives you a drag and drops tool that helps you to build a beautiful website without having coding knowledge.
You can make any type of website like a personal blog or business website using Gator’s website builder.
Web hosting services of HostGator are totally different from the Gator website builder. It is not necessary to choose Gator if you are using HostGator’s web hosting services.
If you want to start a blog and WordPress is not mandatory for you then you can consider Gator as your website builder.
Pros:
- Easily customize your blog with a simple drag and drop website builder.
- You can set up your blog without having any technical knowledge.
- HostGator will handle all the back end tasks such as Backups, performance, and security.
- Free domain and SSL certificate are pre-included with all the paid plans.
- You can also make an online store for your business with Gator website builder
Cons:
- No free account is provided by HostGator but you can try their services for 45 days under the money-back guarantee scheme.
- You can avail of e-commerce features with higher plans.
- Plugins and extensions are limited as compared to other platforms.
Pricing
Pricing varies from time to time. You can check the official website for the latest pricing information.
#4. WordPress.com
WordPress.com is also a company created by Matt Mullenweg, the founder of WordPress.org.
It is a free service using which you can make a simple blog. You can also purchase additional services like custom domain, storage, and other services.
It was started in 2005 by Automattic, a company by WordPress.org. If you want to learn and try WordPress for free then it is the best platform to start a blog.
Pros
- You don’t need any special set up.
- It is very easy to use and manage.
- Totally free for a lifetime. ( Custom Domain Will Cost You Additionally)
Cons
- It does not support custom themes and plugins.
- WordPress.com will put ads on your site. You have no option to put your own ads.
- All the properties of your blog will be owned by WordPress.com. So they can terminate your bog anytime for violating their terms of services.
Pricing
Using WordPress.com is totally free. But WordPress will put ads on your blog.
After using some time if you want to upgrade then it will cost you around $4/Month. It will remove the WordPress.com logo and ads from your blog.
With their paid plans you also get a custom domain for free. There are also other plans available if you need extra storage.
#5. Blogger
Blogger is a free platform for those who want to start a blog for free. It is a service by Google specially designed for users with less technical knowledge.
Blogger was founded by Pyra Labs in 1999 and acquired by Google in 2003.
It is the best blogging platform for newbies who want to start a blog with less investment. You just need a Google account to use blogger.
Pros
- Blogger is totally free
- You don’t need any technical knowledge to make a blog on Blogger.
- It is the product of google. S you don’t need to worry about the security of your blog.
- Hosting is free for a lifetime.
Cons
- Blogger is limited to some basic blogging tools and you can’t add new features.
- Lack of customization options makes bloggers boring. There are some paid themes available but they are of low quality.
- Google doesn’t push updates for bloggers from time to time.
- You don’t have ownership of your own blog. It can be suspended any time by Google without any prior notice.
We don’t suggest you use the blogger to make a blog. But if you are a beginner and trying to learn to blog then you can try it.
Pricing
Blogger is completely free for a lifetime however you need to purchase a custom domain if you need it. Otherwise, you can also blog with the .blogsopt.com subdomain.
#6. Tumblr
Tumblr is a microblogging platform and different from other blogging platforms. In other words, it is the social network of bloggers where you can follow other’s blogs.
Pros
- Tumblr is free like a blogger if you want to use it with its subdomain. Also, you can add a custom domain to your Tumblr blog.
- Super easy to set up and use.
- It has social media components pre-included.
- Tumblr is best for sharing Videos, images, audios, etc.
Cons
- You can’t ad external features like themes or plugins to improve the quality of your blog.
- Taking backups and moving your Tumblr blog to another platform is too difficult.
Pricing
Using Tumblr is totally free but if you want to add a custom domain to it then you have to purchase it.
If you want to add third-party themes and plugins then you have to purchase them.
#7. Medium
Medium is a platform where you can start a blog with limited social networking features. It was founded in 2012 and known as the community of digital experts.
Medium is not like other blogging platforms where you can add your custom domain. It is like a social media platform where you can post articles.
Pros
- You don’t need any setup or coding skills to use Medium.
- It is a place where most of the popular blogger blog. So you can interact with them to improve your knowledge.
- You don’t have to worry about the blog making process. Just focus on writing content.
Cons
- Medium is not a platform to build your own brand.
- Your account can be suspended at any time for violating terms and conditions.
- There is no option to use your own domain name.
- You cant make money with Medium.(By Placing Ads)
Pricing
Medium is also free to use.
Our Recommendation
Above we have discussed 7 Best Blogging Platform To Start A Blog. But not all those are for you.
We always recommend you to use WordPress if you want to stay in blogging for the long term.
If you have no money to invest then what to do?
In that case, we recommend you to start a blog using blogger so that you can move to WordPress in the future.
How To Start A Blog On Blogger?
So you want to start a blog and have no money. Don’t worry.
Blogger is the best free platform to start your blogging career. In this section, we will teach you the best method to use Blogger to make a website.
For this, you only need a Gmail account. We think that you know how to make a Gmail account.
Step 1
Open blogger.com from any of your browsers. Click on Create You Blog.

Step 2
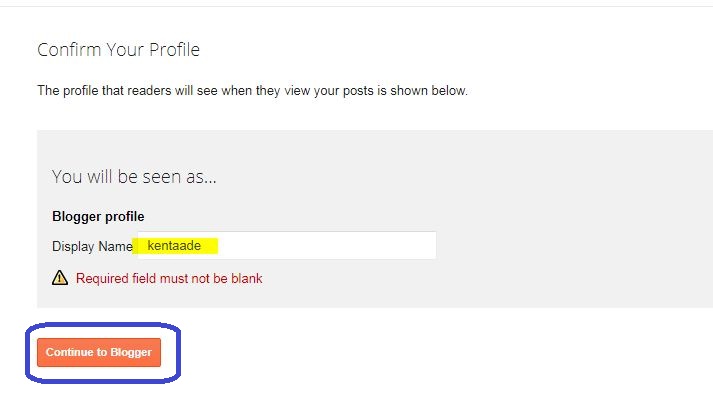
Then Log in with your Gmail ID and Password. It will ask you to set a display name for your blogger profile. After that click on Continue To Blogger.
Step 3
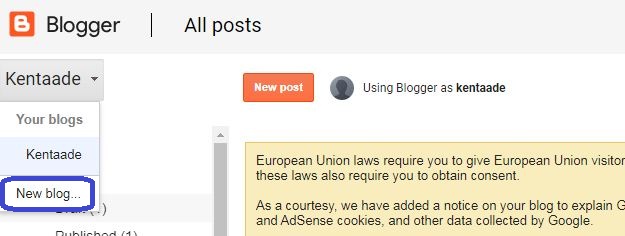
In this step, click on the New Blog tab o the left most corner.

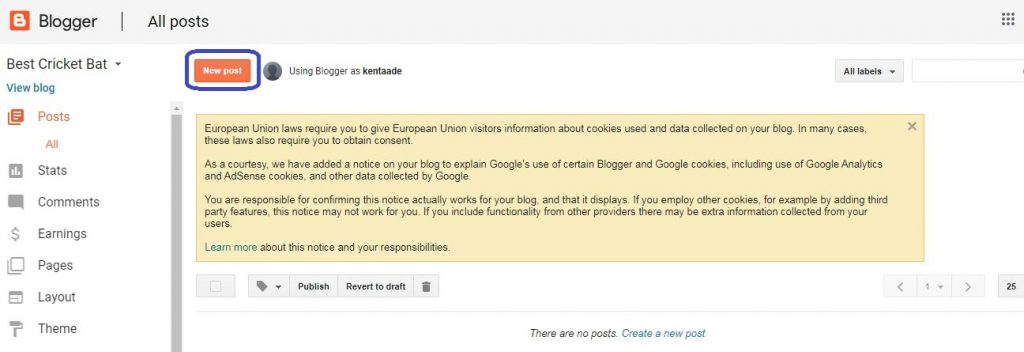
Now enter Title for your blog. Choose an address for your blog and select a theme. After that click on Create Blog.
Now Your Blog is ready. You can start posting on it.
How To Start A Blog On WordPress?
In the above section, we have discussed the procedure to make a blog on blogger.
In this part, we will tell you how to start a blog on WordPress.
This section contains:
- Points to consider while buying hosting
- Connecting Domain with Hosting
- Install WordPress
- Installing an SSL Certificate
- WordPress must have settings
- Best theme for your blog
- Theme customization
- Detailed explanation to WordPress dashboard
- Important Plugins
So if you are planning to make a blog on WordPress then you must need two things.
- Domain Name
- Hosting
Above, We have discussed how to choose the best domain for your blog. Follow that carefully.
After choosing Domain Name next is to buy a good hosting to host your WordPress Blog.
Points To Consider While Buying Web Hosting
Buying the best web hosting for your blog is the most important part while starting a blog. You have to choose the perfect hosting for your blog as per the requirement.
So here we will guide you on what points to consider while buying a web hosting.
#1. Website Builder
Nowadays making a beautiful website is the most important factor if you want to grow your business. For that, you need to expert in coding.
But what if you have no knowledge of coding. In that case, you need a Website Builder to make your blog.
So before choosing a web hosting to make sure that a website builder is included with your plan or not.
A good website builder can help you make your dream design. But if you want to start a blog with WordPress then you don’t need a website builder.
There are many themes and plugins available in the store by using them you can make a beautiful website.
#2. Must-Have SSD
The most important thing to consider while choosing web hosting is the storage type. Nowadays SSDs are the fastest storage available. It is 10x faster as compared to HDD.
So always choose a plan that gives SSD storage. It will make your blog super fast and google loves fast loading websites.
This will help you to rank your blog.
#3. Bandwidth
Bandwidth describes what number of traffic your site can handle. If you are a newbie then no need to worry about bandwidth. All the popular hosting provider gives a sufficient amount of bandwidth with all their plan.
But never go with any free hosting provider as you will surely face the problem with that.
The more traffic the more bandwidth you need. All the web hosting providers provide additional bandwidth also. But you have to buy that.
#4. Storage
Most hosting plans offer unlimited storage, but there are limitations. However, for most small business sites, a low cost shared hosting plan will meet all your storage needs. Unless you have a lot of video or music files on your site, you don’t need more than 1 GB of space.
Most web hosting companies will not accept that users only use them as a file server service. For this, you can use online services like Dropbox or even Google Drive where your files are usually hosted much less than you expect.
#5. Scalability
First, you need your site to handle a huge increase in traffic. Also, you need a hosting provider with whom you can grow organically as your business and future web traffic. When choosing a hosting provider, see how easy it will be to upgrade when you need it.
Can your web host take you from an entry-level shared hosting plan to casual VPS if traffic reaches a certain level and your site doesn’t take time? It is possible for your business to experience seasonal fluctuations in web traffic. It has to be supported seamlessly.
For example, a Diwali Wishing Site will experience a significant flow of web traffic during Diwali. The scalability of a hosting provider allows the site to handle traffic congestion without interruption.
It is important that your site is able to increase visitors and maintain any rapid growth. Make sure you have chosen a host that offers the option to upgrade to VPS.
#6. Access
When you sign up for hosting, you get to manage your hosting account with a control panel. You also need FTP (File Transfer Protocol) to access your files. FTP is the most common method used to host your web pages and other files from your computer and the web host’s computer.
See the maximum file size as this can restrict your ability to upload media files. Many providers also offer an online file manager that is useful for staying out of your regular workstation and making quick updates to your website, including your smartphone.
#7. 24/7 Support
When technical problems arise, you need quick backup support. Good hosting providers provide 24/7 support so that you can get your business online if something goes wrong. Various methods of support are available including email, phone, live chat.
Check your Service Level Agreement (SLA) for details on the support you require. Some providers also determine the expected uptime in their SLAs. Uptime of up to 99% means the site can wait 3.5 days a year.
This is for less than an hour at a 99.99% uptime agreement. All but the most expensive web hosting packages promise five nin (99,999%), where the maximum scheduled downtime is just over five minutes.
#8. Server Location
The closer a data center is to your visitors, the faster the site load. If it is possible for all your visitors to come from one region, select a hosting provider with a data center nearby. Even if this is not the case, you can always buy a web hosting package that includes the option of a content delivery network (CDN).
A CDN retrieves a copy of the page and static content of your website when it is accessed by a region. Cache, as is known, means that visitors to your website receive the data from the next server in their place.
#9. Backup
Last but not least, backing up is an important service that you should get from your hosting provider. Not all hosting companies offer this service as part of your package, so be sure to ask. Backups, as a rule, are automatically deleted from your site every day and stored for seven days, which allows you to restore your site at any time when necessary.
Above are the must-have features to consider while choosing a web hosting. If you have time to check all available web hosting package than its great.
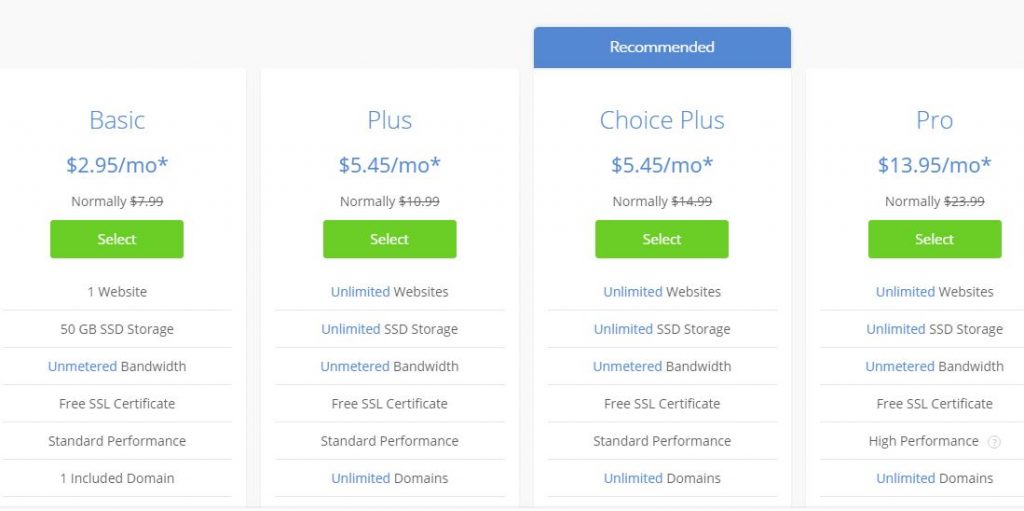
But if you have no time or you are a newbie then we recommend you to use Bluehost. It is the most trusted web hosting provider and is used by many professional bloggers.
Why Bluehost?
Bluehost is the oldest company providing Web Hosting services, It is also recommended by WordPress. So if you want the best web hosting provider to start a WordPress blog then Blue host is a suitable option for you.
Why We Love Bluehost?
Bluehost has all the features that are needed to start a blog. They are:
- With Bluehost, you can get a domain name for free which costs around $14.
- You can install WordPress with just one click which is the great feature by Bluehost web hosting. (We will discuss it later)
- Bluehost is the recommended web hosting service by WordPress since 2005. They have now more than 2.5 million active blogs hosted on their platform.
- Their customer service is mind-blowing. They have a 24/7 active customer service.
- You can get your money back if you are not satisfied with their product.
- Its plan starts from just $2.75/Month.
How To Buy Domain And Hosting From Bluehost?
We are going to give you a brief knowledge on how to start a blog using Bluehost. Follow all the steps.
- Go to Bluehost and click on Get Started.

- Choose any hosting plan as per your requirement. We recommend you select the basic plan if you are new to the blogging field.
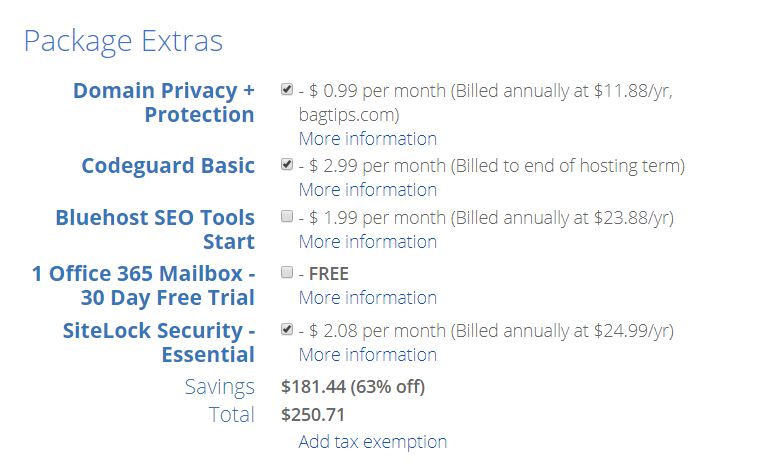
- Now its time to choose a domain name for your blog. You can type your domain in the box or you can use a domain that you have ore owned. Also, you can avail of your free domain later.
- After this, you have to signup for Bluehost. You can do that using your Gmail id and by giving your details.
- In the above picture, you can see the Sigh in With Google button. Just click on that or follow the below steps.
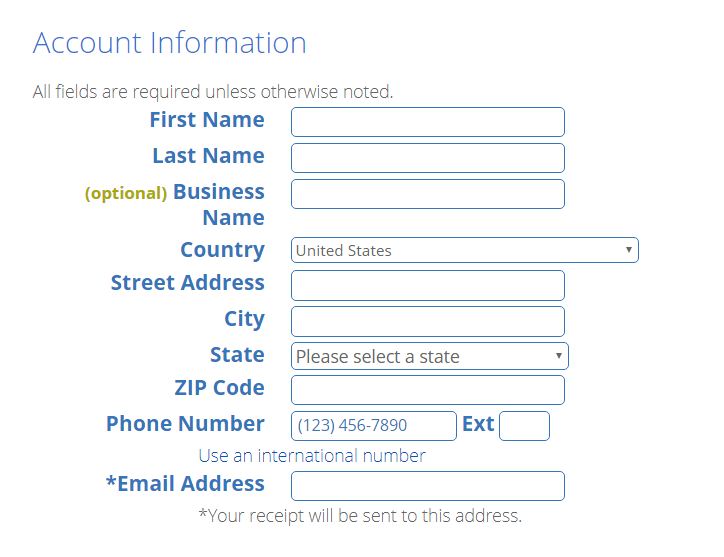
- Put all your details on the form to sign up for Bluehost account. After that, choose the plan details, durations, and other services.
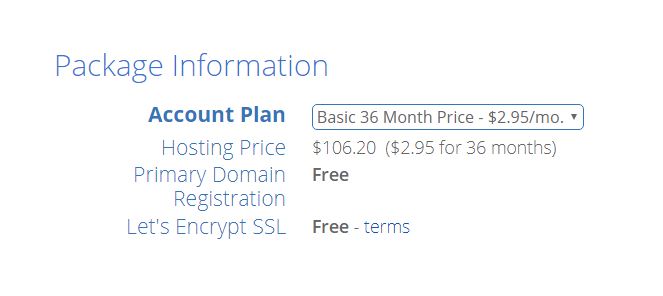
- We recommend you not to choose any extra services as it will cost you high.
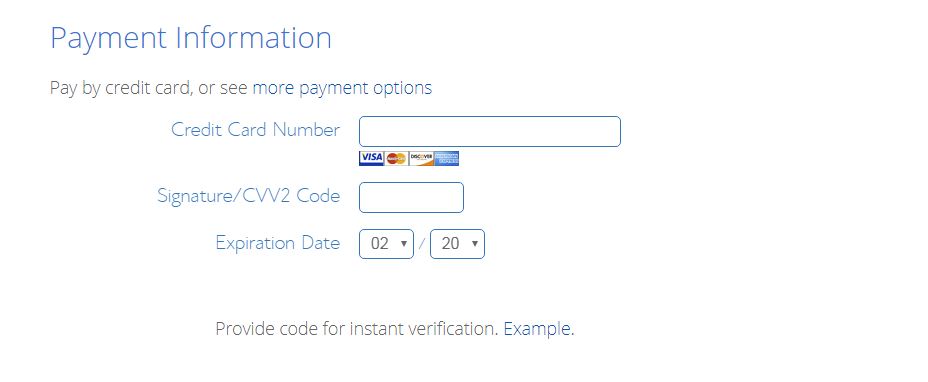
Now you have to give your payment information. You can pay through any available method.
- Click on the terms and conditions and press the submit button.
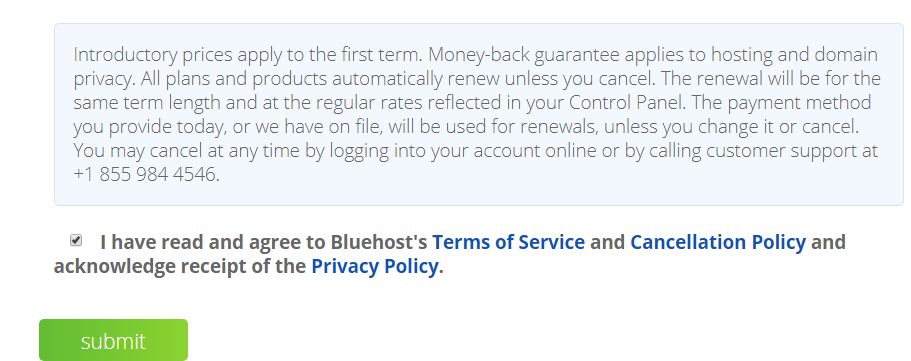
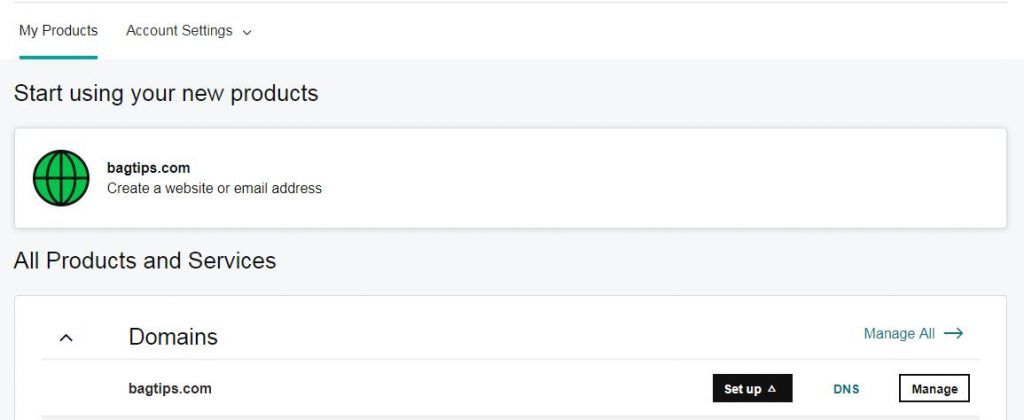
You have successfully created and purchased a web hosting plan from Bluehost. Now its time to start a blog.
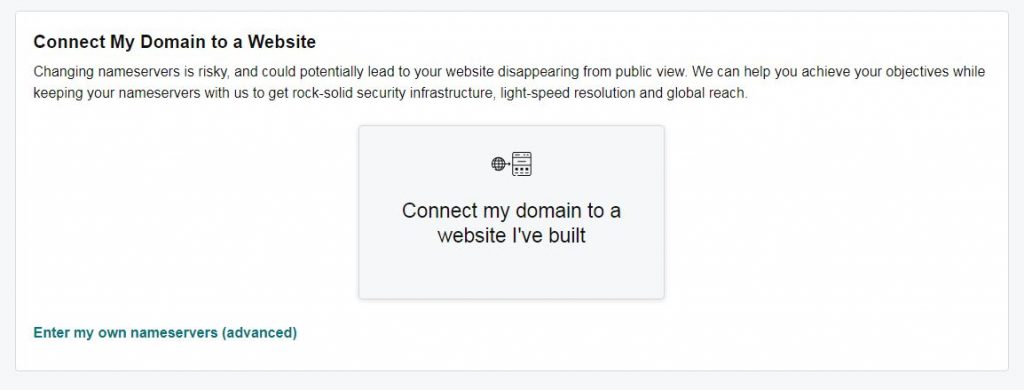
Connecting Domain With Hosting
If you have purchased domain and hosting both from Bluehost then you don’t need to connect it manually. It will automatically be connected with your domain.
But if you have purchased Domain from another registrar then you need to connect it manually with your host. So let’s know how to connect domain with your hosting.
First, open your domain name registrar and login to your account. In our case, we are using GoDaddy. But the procedure is the same for all registrars.
- Visit your product section and select the domain you want to connect with hosting. Now click on DNS.

- Move to the Nameserver section and click on the change button. It will redirect you to the nameserver page.
- Click on the Enter My Own Nameservers button as shown in the image above.
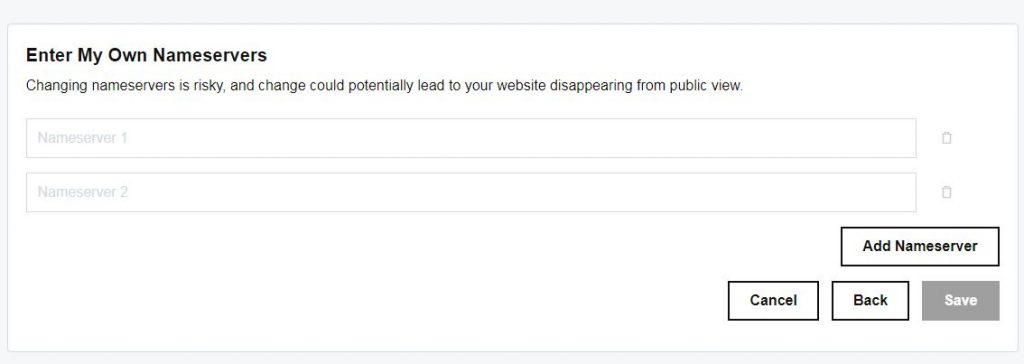
- Now put your nameservers details on the asked field and Save the settings. That’s all.
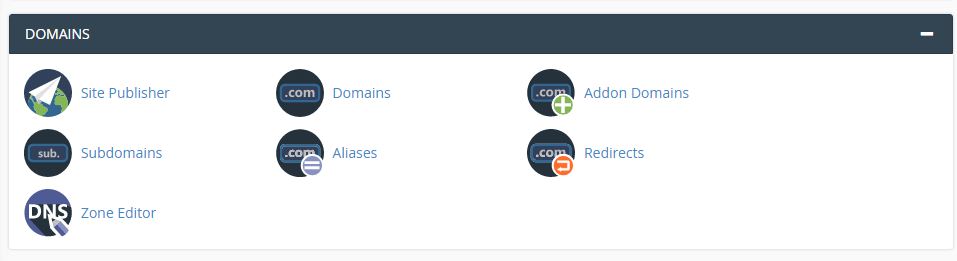
After adding Nameservers to your domain now its time to connect the domain to your hosting.
For that, log in to your hosting account and go to cPanel.
Under the domain, section click on Addon Domain.
Now put your domain name on the required field and click on Add Domain.
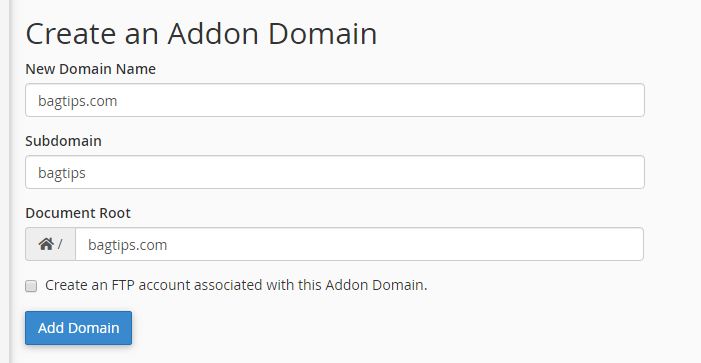
You have successfully added the domain to your hosting.
After connecting Domain with your Hosting it the time to install WordPress.
There are two ways to install WordPress. One is using software and the other is a manual process. Installing WordPress through software is very easy and you can do it with a single click.
But we prefer to install WordPress manually as it is safer
How To Install WordPress Manually?
You need some technical skills to install WordPress manually. But believe us it the easiest things and anyone can do this by following our tutorial.
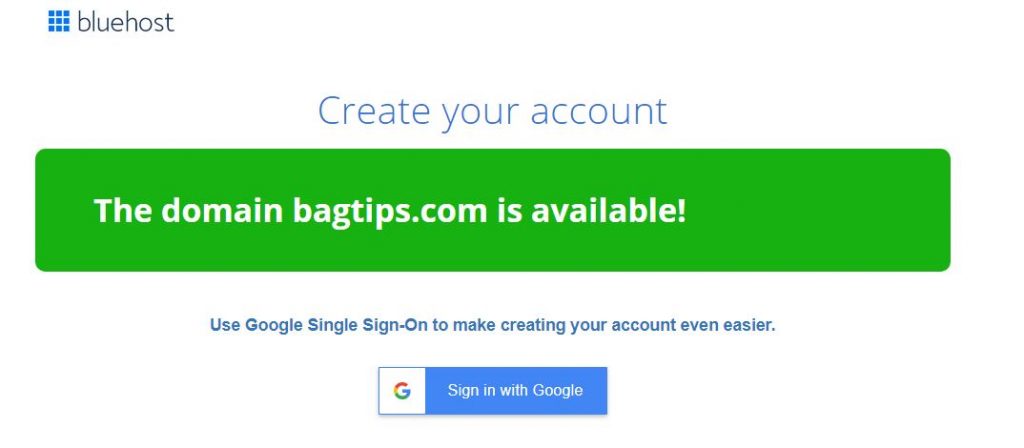
So now start installing WordPress on Bagtips.com.
For that, you need to download WordPress from their official website. Go to WordPress.org

Now click on the Get WordPress button on the right.
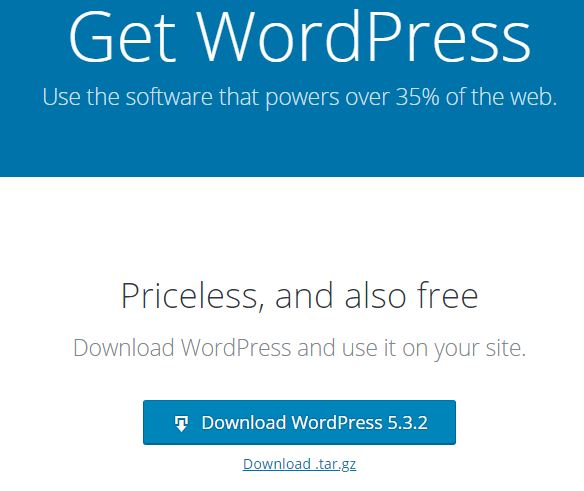
Click on the Download WordPress button to get the latest version of WordPress.
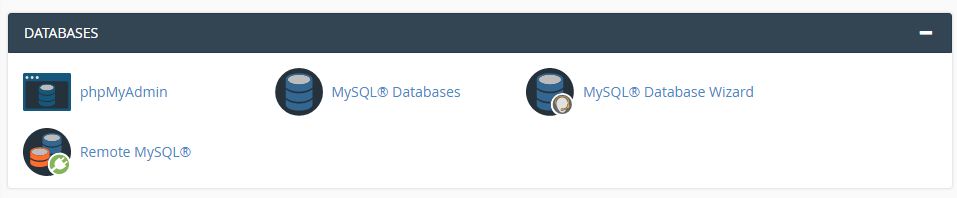
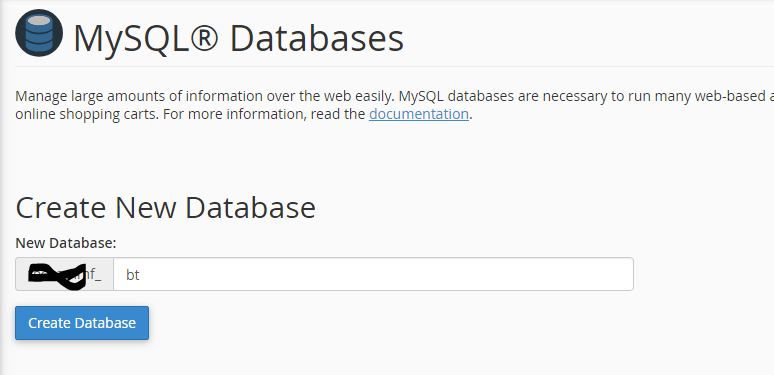
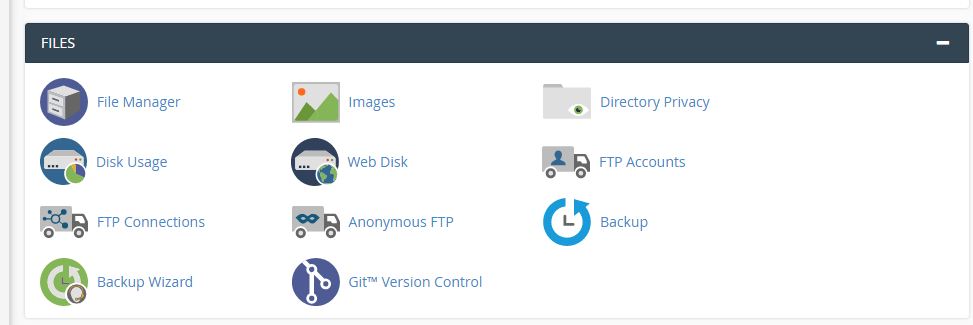
After downloading WordPress now its time to configure it for your domain. For that, we need to create a My SQL database for your domain. To do that open your cPanel and move to Database.
Click on My SQL Database. Create a database for your blog.
After creating click on the back button. Now its time to add a new user to your database.
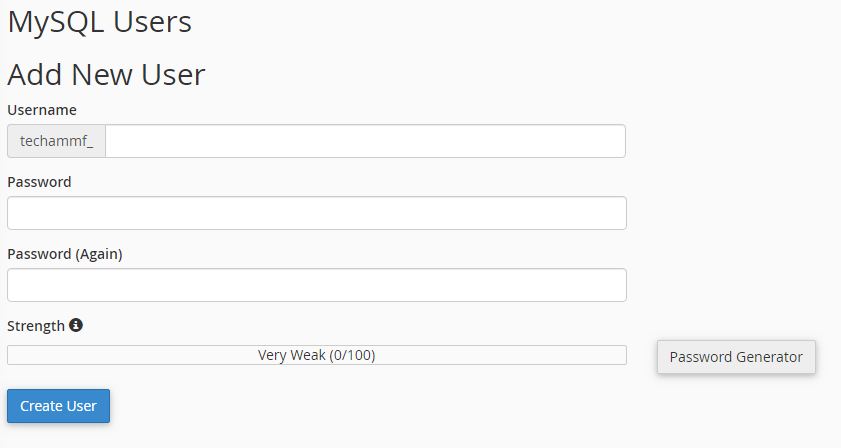
Put all the information and click on Create User. After creating a user you have to assign permission to the user. Assign the user to your database and give all permission.
That’s all. Now its time to configure the downloaded WordPress file to use it with the database.
- First, Download Notepad++.
- Extract the downloaded WordPress file.
- Rename wp-config-sample.php to wp-config.php
- Now open wp-config with notepad++
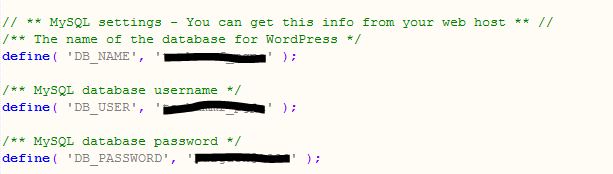
- Enter your database name in the DB_Name field. Put the Database user name in the DB_USER section. Enter your password in the DB_Password area.
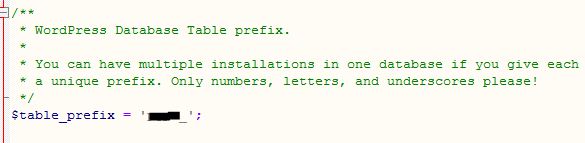
- Put table prefix as shown in the image above.
That all the settings. Now save the file. After this, you have to archive your WordPress folder with .zip format.
That’s all. Now its time to upload the WordPress file to your domain’s file manager.
For that open cPanel and click on file manager.
It will open the file manager for you and show all the domains connected with your hosting. Choose the domain you want to install WordPress.
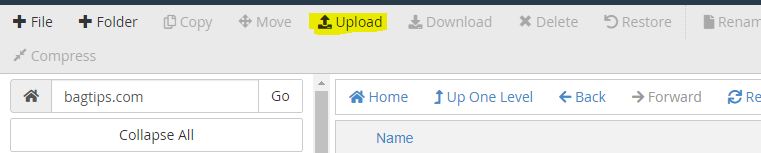
Now, click on the upload button as shown in the image.
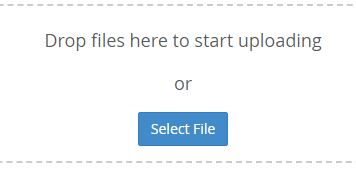
Click on the Select File and choose the WordPress file. After some time it will be uploaded to your server. Now do some work carefully. Click on the back button.
Now extract the Zip File.
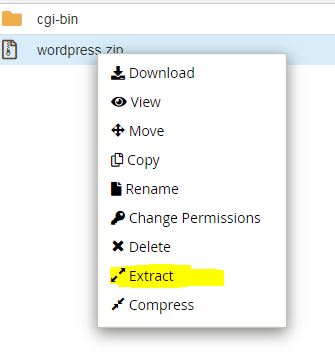
After extracting, come back and delete the WordPress.zip file permanently. Then open the WordPress folder and select all files and move them to your domain’s root folder.
Delete the Empty WordPress folder. Now you are ready to install WordPress on the domain.
Now Its Time To Install
Open Any web browser and type your domain, click enter.
You will see a page asking to install WordPress. Select the language and click on Continue.

Now it will ask you for your login information. Put them and click on Install WordPress.
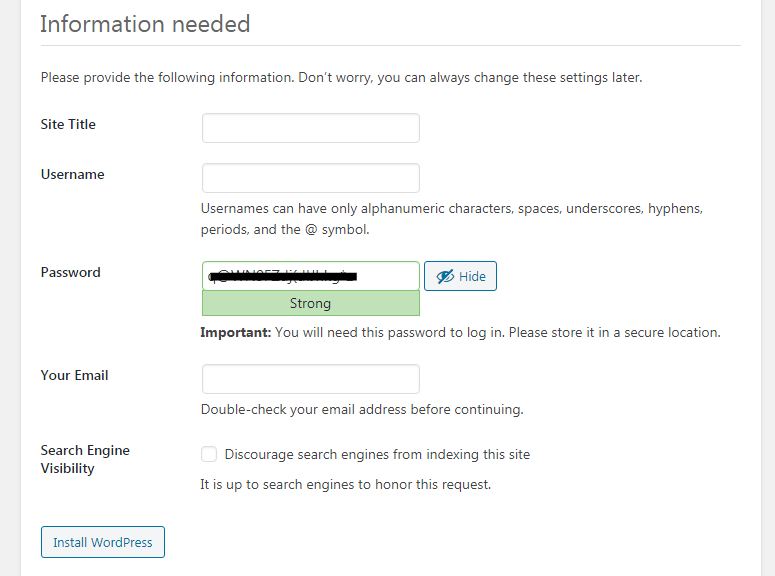
Hureeeey! You have successfully installed WordPress.
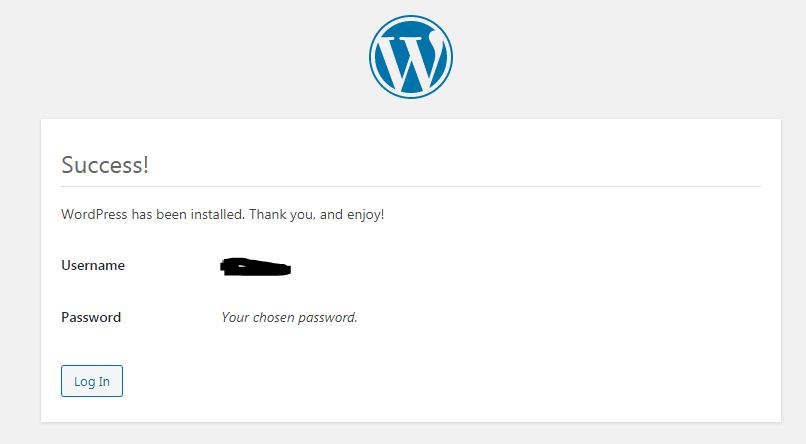
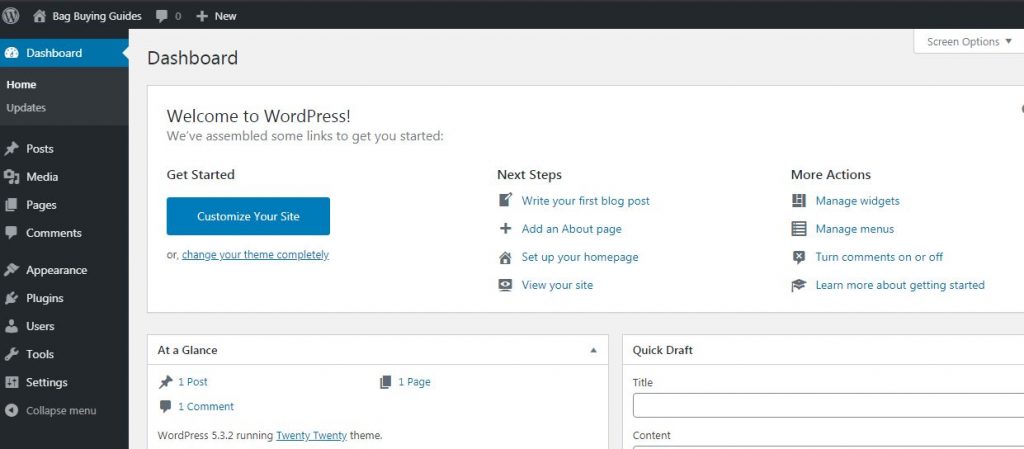
Click on the login button to access WordPress.
You can see WordPress’s interface in the below picture.
How To Install An SSL Certificate On Your Domain
After installing WordPress on your domain, the most important part is to secure your website. Here the SSL comes to work. So in this part of the article, we will discuss the importance of an SSL Certificate and how to install it.
What Is An SSL Certificate?
SSL Certificates are small data files that digitally bind a cryptographic key to an organization’s details. When installed on a web server, it activates the padlock and the https protocol and allows secure connections from a web server to a browser. Typically, SSL is used to secure credit card transactions, data transfer, and logins, and more recently is becoming the norm when securing browsing of social media sites.
Source- https://www.globalsign.com/
How To Install SSL Certificate?
If you have purchased web hosting on Bluehost then SSL will automatically installed on your domain. But if you are using another hosting then you have to do it manually.
To make your site more secure we will use Cloudflare. You can install SSL without Cloudflare also. But we recommend using Cloudflare.
For that, you need an account on Cloudflare. If you have one then its great. But if you don’t have then make it. Don’t worry, it’s very easy.
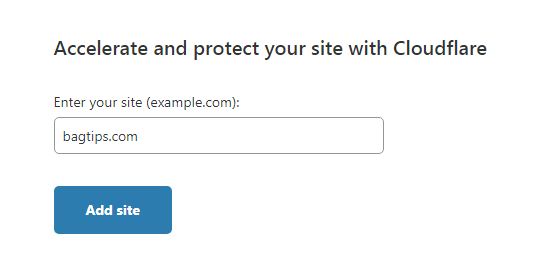
- Now log in to your Cloudflare account and click on add a site.
- It will ask to enter the website name. Put your site name and click on the add site.
- After that, it will display some data. Don’t do anything, just click on continue.
- Now its time to change the Nameservers of your domain with Cloudflare’s Nameservers.

- For that, open your domain registrar’s account and go to the DNS setting for your domain. And change the NAmeservers o your domain and save that.
- Now click on the Done, Check Nameservers button.
It will take some time depending on the server response by Cloudflare. You just have to wait. It can take between 10 minutes to 24 hours. But usually, it doesn’t take more than 10 minutes.
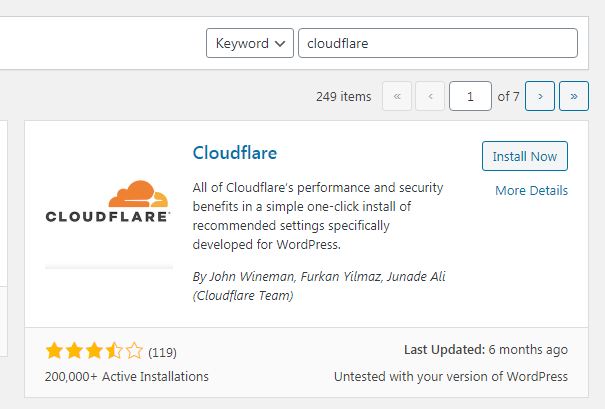
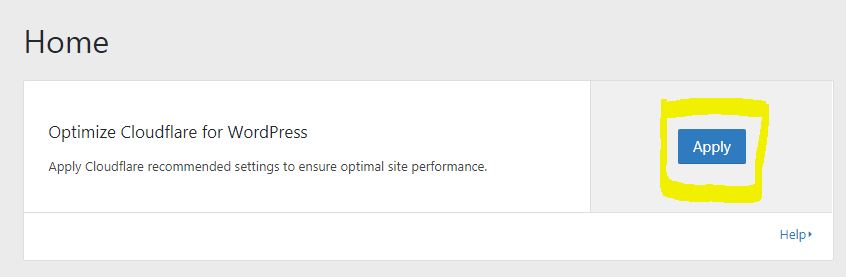
After activating your domain with Cloudflare now its time to install Cloudflare plugin on your WordPress dashboard.
- For that open your Dashboard and add a new plugin. Search for Cloudflare and install the plugin shown in the picture below.
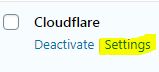
- Now go to settings of the Cloudflare plugin.
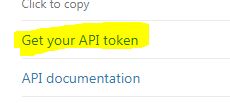
- You have to log in to your Cloudflare account by clicking sign in here. It will ask you for an API key.

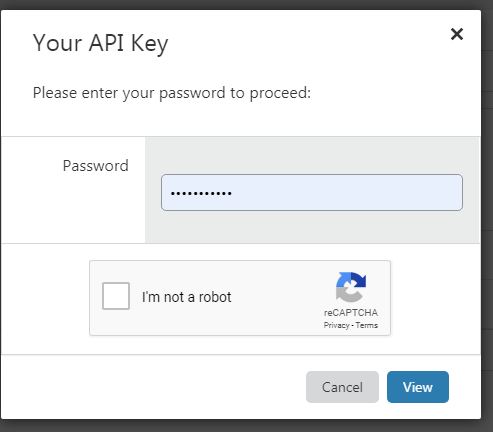
- For that open your domain on Cloudflare account and click on Get Your API Token.
- Under the Global API Key section click on View.
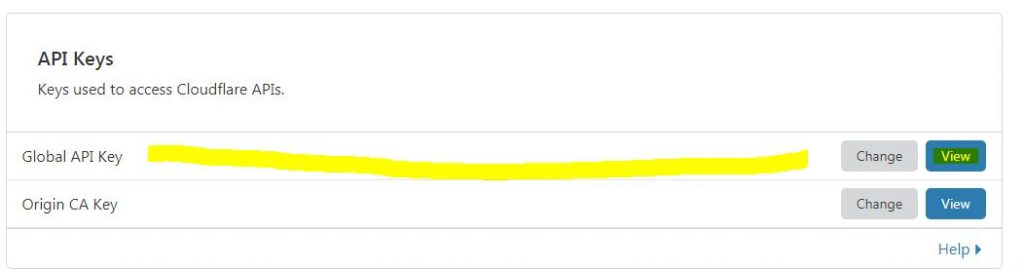
- Confirm your password and solve Captcha. Click on the view button to get your API key.
- Now put API key on the Cloudflare plugin and save it. After that click on the Apply button shown in the image below.
That’s all, now you are almost ready to install an SSL certificate on your domain. You need just one more step to connect the SSL to your domain.
Download a plugin called Really Simple SSL and install it on your WordPress. Activate it.
Congratulations, Now your website is fully secured.
Steps to Choose Right WordPress Theme!
Thousands of WordPress themes are available at various sources. So it sometimes becomes very difficult for the user to choose the correct WordPress theme.
So, bring you some quick tips that the user can follow while selecting a theme for his or her WordPress website:
- Choose Free/Premium WordPress Themes
The person or the user should be able to self-evaluate that his purpose of the website will get resolved by a normal free WordPress theme or whether he or she should go for a premium theme.
The user should keep in the mind the long term and the short term benefits which are offered by the free and premium themes.
In the normal scenario, it is always advisable that people should go for premium themes.
This is because just by paying a small amount of money, the user will unlock various features and benefits which are much more worth when compared to the price which has been paid by the user.
The major benefit of using a free theme is that if by chance the user does not like the theme, he or she can easily replace it without incurring any cost.
The major advantage of using a purchased premium theme is that if in the future, the user faces any technical issue, bugs or any problem related to customization, then the team is available for providing a quick and effective solution to the client as the user has paid a fee for purchasing the theme.
One major disadvantage of purchasing a premium theme is that if in the future, the user does not like the theme or the theme is no longer serving the required purpose of the client, then it needs to be discarded.
This results in loss of the onetime payment which the user has already incurred during the time of purchasing the theme.
- Proper Knowledge of Niche Blog
The second factor which affects the purchase decision of the right WordPress theme is the proper technical knowhow of the niche blog which the user is willing to work upon.
If the user or client does not know the ins and outs of the niche subject, then this would result in making an inappropriate website and will further lead to the wrong selection of the WordPress theme.
If proper knowledge is present regarding the niche subject, then the user can format the content of the WordPress website accordingly and can also select the best-suited WordPress theme.
- Using Credible Sources
The next best step or method to choose the right theme for the WordPress website is selecting the theme which is from a credible source only.
If any theme is selected by the user which is not from a very trusted source, then this can result in loss of compatibility and also no further assistance can be provided by the seller side in the case of any malfunction or data loss.
Steps to Install Free WordPress Theme
When you have found the best-suited theme for your WordPress website, then the next step is to apply the theme in the backend side of the WordPress website.
The steps to do the same are as follows:
- The first step is to visit the WordPress website.
- The second step is to login to the WordPress platform using the unique ID and password which the user has already set.
- The third step is to click on the appearance tab.
- The fourth step is to select the option which displays the name Themes which can be easily seen in the WordPress dashboard.
- After clicking on the theme option, click on the option which says add new.
- Now, a list will be displayed using which, the user can easily filter out the results based on the features of the themes, the popularity of the themes, the recency of the theme and also the theme which is the favorite of the masses.
- Another method of doing the same is by using the option of feature filter which helps the user in filtering the theme results based on the offerings and unique features.
- Once you have selected the best-suited theme for your website, click on the preview option for getting a trailing window which displays the theme.
- If the theme sets the scenario and looks ok to the user, click on the install button.
- After clicking on the install button, another preview option will appear which will ask to give a preview to you about how your website will look after installing the theme.
- After watching the preview, click on the activate button. This will load the theme on your WordPress website.
50+ Essential Settings You Need To Configure After Installing WordPress
Are you tired weeding through numerous complex and time-consuming articles regarding the configuration of WordPress settings on the internet?
Also, are you confused between various plugins and settings and are looking for a solution for choosing the correct one?
If yes, then you have landed just at the right place as in this insightful article we will be providing a list of the essential and must-have WordPress settings that one should configure while setting up a WordPress website.
WordPress is a simple tool that can be used by the clients for their personal as well for professional use.
By correctly setting up WordPress, one can reap in huge benefits and can generate a huge amount of profits by attracting a good amount of traffic to the blog or the website.
The settings of WordPress are divided into three categories:
- Basic Settings
The first category is the basic settings. These are the set of processes which the user needs to perform just after he has set up his or her WordPress account.
- Intermediated Settings
These are the settings that the user needs to do to get the overall structure and design stability of the WordPress website.
The features and settings like setting up the permanent link of the website, setting the google analytics dashboard and account of the WordPress website, etc. come under the intermediated settings.
- Advance Settings
These are the set of processes that requires a high level of knowledge and learning display from the user’s side.
This includes optimizing the website by installing various unique plugins, using certain codes and programming languages for performance improvement and optimization of the WordPress website.
The basic settings can be done by any person and do not require any prior knowledge or experience pf the WordPress website. The various settings under basic WordPress settings are as follows:
#1. Resetting the Password of the WordPress Website
The first and the most common setting when a person is setting up his or her WordPress website is resetting the password of the WordPress account.
This is necessary if this password is hacked in the future, then all the hard work and information about the website can be misused by anyone in the world.
The password should be set in such a way that it is a strong password and cannot be easily guessed by any other user.
The users should avoid keeping passwords such as the birth dates, anniversary dates, mobile numbers, dog or cat’s name, etc. as all these are very easy to guess and can be hacked or manipulated.
The steps to reset the WordPress password are as follows:
- Click on the button which displays the name users.
- Then click on the option which says profile.
- After this, click on the generate new password option.
- Copy the generated password and save it for future use.
- Click on log out of all devices.
- By this time, your password would have been resettled.
Do not forget to write the password somewhere before logging out of all the devices.
This is because if you do not remember the new password, then you would not be able to retrieve the WordPress account.
#2. WordPress Dashboard Updating
The WordPress dashboard should always be kept in a tidy and optimized state.
This is because the WordPress dashboard is the very first landing page that the user sees just after logging in into the WordPress account.
The plugins, organic views, traffic, monthly and daily analysis, etc. all can be easily seen on the WordPress dashboard.
The easy and time-saving steps to clean up the dashboard are as follows:
- As soon as you land on the dashboard page, click on the button which says screen options on the top right-hand corner.
- After clicking on the button, you will be able to see various checkboxes that will display all the features of the widgets which are already displayed on the dashboard.
- Select or deselect the required on not required widgets by clicking on the checkboxes.
- It must be kept in the mind by the user that every dashboard looks different from other dashboards. The reason behind this is that every user installs different kinds of plugins.
This gives a different appearance to each dashboard.
Thus, by keeping the dashboard clean, the user can optimize the speed of his or her WordPress website and can also work hassle-free without any confusion in the mind.
#3. Website Title
The WordPress website title is something that is of utmost importance, although it comes in the basic settings.
The WordPress website title is the first thing that the visitor will come across when he or she lands on that particular home page of the WordPress website.
Two things should be kept in mind by the owner of the WordPress website before setting up the title of the WordPress website.
- The first thing is keeping the title of the WordPress website following the content and basic purpose for which the WordPress website is being set up.
This will help to attract more people towards the website just by looking at the name of the website.
- The second reason is Search Engine Optimization(SEO). If proper SEO is done and the title of the website is kept following the same, then this will increase the website ranking.
This will also result in attracting more people towards the website and generate more revenue.
#4. The tagline of the WordPress Website
The tagline of any WordPress website is not as important as the tile of the website. But still, a lot of benefits can be reaped if the proper tagline is assigned to the WordPress website.
A lot of big brands that are operating all around the globe are famous not by their brand name, but by the taglines which they are using from the past many decades and centuries.
The steps to change the tagline of your WordPress website are as follows:
- Click on the settings button which is present in the dashboard of the WordPress website.
- After that, select the button which says general settings.
- After selecting the general settings options, you will come across a list of options in which, the third option would be a tagline.
- Click on the tagline option and enter the tagline of your choice which you want to display in your WordPress website.
#5. URL Setup
Many people who are using the WordPress platform do not give importance to the URL setup.
The URL can be setup in two ways. The first way consists of www before the name of the WordPress website. The second way does not consist of www before the name of the WordPress website.
The method to setup the URL of the WordPress website is as follows:
- The first step is to select the option which says settings.
- The second step is to select general settings from the menu.
- The third step is to select the option which says WordPress URL or the site address URL.
- Now, you can enter the desired URL which you want the users to type in and reach your particular WordPress website.
It should always be kept in the mind by the user that the URL of the WordPress website should not be very long and they should try to avoid the use of many complex terms in the URL.
#6. Time and Date Configuration
The date and time is something that the user needs to see all the time while he or she is browsing the data or videos on any website.
Also, from the reader’s point of view, the date and time are very important. The WordPress website owner should keep in his or her mind the different time zones of the world and should post the data or other content following the same.
The steps to set the date and time in the WordPress website are as follows:
- Click on the Settings option.
- Then click on the general settings option.
- Now, scroll down the page which has just opened. After some seconds you will see the boxes which have time zones, time format and date format written on them.
- Change the formats of time and date following your WordPress website. Save the changes.
#7. Restricting the Membership
The platform of WordPress allows the readers or the users to register on the website.
Thus, by the means of registering themselves on the website, they become part of the WordPress website.
Sometimes, by doing the same, the owner of the WordPress website tries to transfer the ownership of the website to the readers on a partial basis to make them feel important and part of the ongoing process.
But it should always be kept in the mind by the owner of the WordPress website that the access to the readers should not be granted fully as this can result in huge website manipulation.
So for this, the owner needs to disable these particular options from the settings tab.
The steps to do the same are as follows:
- Click on the Settings tab from the dashboard.
- Now, select the button which has general settings displayed on it.
- After scrolling down on the page, the reader will come across a box that says membership.
- The owner can check or uncheck the box according to his will.
#8. Constant Checking for WordPress Updates
Now and then the WordPress platform comes up with various updates for the users.
These updates should be incorporated by the users of the platform regularly as it keeps the website up to date and also ensures the smooth and hassle-free browsing from the reader’s end.
The constant update also ensures that all the broken links, technical glitches, bugs, etc. are rectified or removed regularly.
The steps to update WordPress are as follows:
- Open the dashboard of the WordPress website.
- Click on the option which says updates thatare present on the left side.
- After clicking on the update option, a box will pop up which will display the current status of the version.
- If it says updates are pending, then click on the update now option.
- In the other case, it will display that your WordPress platform is up to date.
#9. WordPress Language Preferences
WordPress is a global platform that is used by lakhs of users all around the world. WordPress is also available in various languages according to the country or the region.
So, one of the most important contributors to the global acceptance of WordPress is that it is available in more than 100 languages.
So, a person who is new to the WordPress platform can choose his or her native language and can easily explore the world of WordPress.
This particular feature offered by the WordPress platform is very important because English is a globally excepted language but still many parts of the world prefer speaking in their native language.
Thus, for the overall ease, the WordPress admin panel can be changed to your preferred language if the option is available in the list of the languages of WordPress.
There are two ends in WordPress. The first is the backend and the second is the frontend. A user can change the languages of both the frontend and the backend according to his or her need and desire.
A plugin named WP Google Translate is used to translate the content which is available in frontend of the desired or workable language.
The easy steps to change the language in the WordPress platform are as follows:
- Click on the Settings icon from the dashboard.
- Select the general settings option.
- Now scroll down a little. You will see the icon named Site language. Click on the icon.
- The icon will contain a long list of languages. The user can go through the list and select the language which he or she prefers.
#10.Deletion of Dummy Content
The dummy data is a tutorial kind of data that is added from the WordPress side whenever a person installs WordPress.
This data is used by the user for the first time walkthrough for WordPress and to have quick learning about the various features offered by WordPress.
But, this dummy data should be deleted after the installation of WordPress is completed.
This should be done to avoid the redundant space occupancy done by the dummy data. If the space is available, then this will improve the performance, make the speed faster and will also optimize the process.
The easy and time-saving steps to delete the dummy data or the post from the WordPress platform are as follows:
- The first step is to click on the icon which says posts.
- The second step is to select the icon which says all posts.
- The third step is to delete the first post which says hello world.
- If by chance you have already added some post, then this hello world post will come a little down. Scroll down to find the post and delete it manually.
- Click on the hello world post and select the option which says trash.
- After clicking on trash, the dummy post will be deleted from your WordPress account.
#11. Formation of WordPress Web pages
The main and most setting the user of WordPress platform has to do is the formation of the different basic webpages of the website.
These are the basic supplement pages that every WordPress user needs to set up to ensure smooth functioning for the reader as well as the user’s side.
These pages generally do not involve the content of the material which is to be posted on the WordPress website.
The majority of the people who develop a website on the WordPress platform have to motive of generating revenues and profits for themselves or the organization for which they are working.
Thus, like every other business or a company, the websites also have to follow a certain set of rules and regulations.
It is always advisable to every WordPress platform user to include the privacy policy of the website. It is also mandatory to include the terms and condition page of the particular WordPress website.
Also, the user has to keep in his or her mind other sets of laws and guidelines which they have to follows if they are making an affiliate website, product review website, etc.
The steps to do the same are as follows:
- The first step is to click on the icon which says pages.
- The second step is to click on the add pages’ option.
- This process needs to be repeated every time the user wants to add a new page.
- Keep on saving the changes after every step.
#12. WordPress Website Menu
The menu of any website is the most important part of the website. As soon as a visitor lands on the website page, the first thing which he or she notices is the Menu of the WordPress website.
This menu of the website can be easily altered and designed according to the desire of the owner of the WordPress website.
They have different sets of combinations from which they can choose and put different widgets on the menu.
It is always advisable to put the main home page link, content link and other important links on the menu itself. This facilitates the ease of the visitors and saves time.
It should be kept in the mind by the owner or the designer of the WordPress website that the space that is available for the menu is always limited. So they have to wisely choose the content for the menu.
The steps to design the menu for the WordPress website are as follows:
- The first step is to click on the appearance option.
- The second step is to select the Menus option.
- The third step is to select the Create a new menu option.
- The next step is to add the desired items like the links, post titles, categories or the pages using the options which are present in the left-hand side menu.
- After all the necessary items are chosen, the application and save changes button needs to be tapped by the user of the WordPress website.
#13. Removal of Unused Themes and Plugins
The next and one of the most important steps is to delete or remove all the themes and the different types of plugins from the WordPress website.
This results in reducing the space occupancy and also helps to improve the speed of the website as the deletion of unwanted content and files results in making the website light.
The main concept behind deleting the old versions of the themes and plugins is the same which we follow while purchasing a new mobile phone.
When a person purchases a new smartphone, he or she replaces their old phone by this new handset.
Thus, the same is the case in WordPress. When new themes and plugins are installed on the WordPress platform, the old versions need to be deleted so that the focus is only on the new and useful versions.
The simple and efficient steps to do the same are as follows:
- First, click on the icon which says appearance.
- The next step is to click on the icon which says themes.
- The third step is to see the list of the themes which are displayed. The unwanted themes can be removed by hovering the mouse over them and clicking on the theme details option.
- After clicking on the theme details option, the new window will pop up. The delete button will be present on the bottom right corner of the window. Click on that button.
- The theme will be deleted from your respective WordPress account or platform.
The simple steps to delete the plugins which are redundant from the WordPress platform are as follows:
- The first step is to click on the option which says plugins.
- The second step is to open the installed plugins option by clicking on it.
- The list of all the installed plugins will be displayed in front of you.
- Click on the plugin which you want to remove.
- Select the deactivate plugin option before deleting the plugin.
- After selecting the deactivate option, the delete option will start appearing beside the deactivated plugin. Click on the delete button.
- The selected plugin will be deleted from the WordPress platform.
#14. Updating the WordPress Plugins
WordPress is a very dynamic platform. The company technicians come out with various and frequent updates now and then.
Thus, it should be kept in the mind and made a habit by the WordPress user to constantly update the WordPress platform.
This frequent up-gradation will result in improving the performance of the website, resolve the bug fixes, optimize the site performance and also remove any kind of lags or delays.
The updates will also ensure that the security of the WordPress website is not at all compromised. Also, the updates will ensure that all the versions of different kinds of files are compatible with the WordPress platform.
The steps to update the plugins in the WordPress platform are as follows:
- The first step is to click on the icon which displays plugins in the dashboard of the WordPress website.
- The second step is to select the icon which says installed plugins.
- A list will be displayed which shows the names of all the plugins which are installed in the WordPress platform.
- The plugins which are not updated will have an update now option besides their name. Click on the update now option.
- The required plugins will get updated.
All the above settings are the ones that come under the Basic Settings of WordPress platform. Now, we will learn about the must-have intermediate settings for the WordPress platform.
Intermediate Settings for WordPress
#15. The Set-Up of Permanent Links
The setting up of the permalinks is the first setting that comes under the intermediate settings for the WordPress platform.
The term unique identifiers are the right terms that can be used to describe the permalink of a WordPress website.
This particular link defines the URL of the website and also helps in the improvement in the ranking of the particular website.
It is always advised by the experts that the permalink should always be set up before the user or the owner of the WordPress website starts posting the content or the blogs.
The steps to set up permalink in WordPress are as follows:
- The first step is to click on the button of settings from the dashboard of the WordPress website.
- The second step is to click on the permalink option from the list.
- After clicking on the permalink, a list will open which will display the various templates which are available for setting up the permalink of the WordPress website.
- Select any template which you feel will serve your purpose efficiently.
- We will recommend you to choose from either month and name or the post name option. These two are the best in WordPress.
#16. Setting Up the Media Sizes
This is one of the most important settings out of the various settings which we have already discussed or are going to discuss.
The different videos and images which the user wants to display on his or her website’s content are uploaded on the WordPress platform first. These files consume a good amount of storage space for WordPress.
So it becomes very important to determine the exact and the correct dimensions of the images or the video files that the owner is going to use in his or her articles or blogs.
The importance of images and other graphic files is that they help increase the viewer engagement and thus also helps in making the customer spend more time on the website.
But piling up images that are not very important on the WordPress platform results in making the site slow and constant lag in the website’s performance.
And this lag can not only be experienced from the owner’s end, but also from the visitor’s end which makes it very irritating for the visitor.
The steps to do the same are as follows:
- The first step is to open the settings of the WordPress platform.
- The second step is to open the icon which says media.
- The third step is to set the different dimensions for the different types of images like thumbnails, large images, small images, medium images, etc.
- Thus will also result in bringing uniformity in the website’s overall structure.
#17. Customizing the Footers and Widgets
When a website is designed, many areas are left which does not contain any sort of content or image or any other file. These types of areas are known as Blank Slates.
Talking from a technical viewpoint, these blank spaces should be filled with content or any other image file to achieve the optimum utilization of the space provided on the website.
These type of blank spaces are also known as the widget enabled areas.
The main point of these widget enabled areas is that these areas remain the same throughout the website. Once you have set these areas, they will be the same in each post of yours.
The steps to set these blank spaces or the widget enabled areas are as follows:
- The first step is to click on the icon which says appearance.
- The second step is to select the icon which says widgets.
- Then a list will open which will display all the types of widgets that are available for the use.
- Select the widget which you want to use and drag it to the desired area and leave it there.
- The widget will be added at that particular point of drop and can be seen at the same place in each post of the website.
#18. Creating the Right Taxonomies
Insimple words, the term taxonomy means creating different segments or categories.
Whenever a website is created on the WordPress platform, the creator has in his or her mind the various fields and segments which he or she would be coveredon their website.
Each category is referred to as one taxonomy. There can be n number of taxonomies in WordPress website.
So for understanding, let us take an example of a website that sells books online. So, for such a website, the first taxonomy can be books, second can be authors, third can be the price range, fourth can be genre and so on.
The steps to create the taxonomies in the WordPress platform are as follows:
- The first step is to click on the posts icon from the dashboard.
- The second step can be done by clicking on either the category option or the tags option.
- The only difference between the above step is that the tags are not hierarchical while on the other hand, the categories are hierarchical.
- Then a list will be displayed which can be used to set the desired taxonomies of the categories as well as the tags.
- The custom taxonomies can also be created, but this needs some technical expertise and is not very simple to perform.
#19. Google Analytics Account
Almost everything in this world which is running on the internet is directly or indirectly governed by Google.
So, it is always advised by the experts of digital marketing that when a person is creating his or her website, they should link their WordPress account with the Google analytics even before they start writing or posting their first post or blog.
The Google Analytics account helps the website owners to know which type of content is most liked by the visitors and which type is not at all liked.
It also helps in knowing the regions from wherethe majority of the traffic is coming to the WordPress website. It also helps WordPress owners to mold the website accordingly.
The steps to link the WordPress website with the Google Analytics account are as follows:
- The first step is to do link Google analytics with your website manually. This can be done by just pasting the Google analytics code in the header.php file.
- The second way to link the google analytics with your website is by using the google analytics’ tracking ID and linking it with the website URL.
- The third way to link the google analytics account with the website is by using various kinds ofplugin like Rank Math.
#20. Google Search Console Verification
Another very important intermediate setting for the WordPress platform is the verification of the website using the google search console.
But it should be kept in the mind by the website designer that this step can only be done once he or she has linked the google analytics account with the website.
The main use of the google console is that it helps in website management. It tells the owner in what way is the google navigating their website.
It also helps in determining the ranking of the website, solves the indexing issues and also gives a site map of the respective website.
The simple steps to verify the website using the google console are as follows:
- The first way to verify is by using the Rank Math. It provides many dedicated ways to verify the website with the help of the Google webmaster tools.
- The second way to verify is by using a dignified plugin. The plugin like Code snippets plugin can be used for verifying the website with google console.
#21. Contact Form
The visitors or the readers of the website are the most important person from a website owner’s point of view.
Thus, the owner should keep in mind what the readers want and should try and cater to their needs from time to time.
One such way of catering and knowing the needs of the readers is by making a contact form available on the WordPress website.
When the contact form is available on the website, the readers can easily communicate with the owners of the website and ask their queries to them. They can also provide valuable suggestions to the owners.
Just like the terms and conditions page and also the privacy policy page, the contact form is also of utmost importance from a website owner’s point of view.
The steps to make a contact form in the WordPress website are as follows:
- The first step is to create a fresh form in the WordPress platform.
- Name the form like the contact form.
- The third step is to install the Ninja forms plugin or the contact form 7 plugin.
- The fourth step is to again create a new form using the drag and build option.
- The next step is to copy the code of the form and then paste it in the contact us page.
#22. Updating WordPress Profile
Whenever a user is setting up a website, he or she should also focus on the profile of WordPress.
Before a person starts to upload content or images on the website, he or she should set up the completeprofile of WordPress.
Whenever a reader visits the website and is going through your posted content, he or she would be willing to know more about the author of that particular article.
The steps to update the author’s profile in the WordPress platform are as follows:
- The first step is to click on the icon which says, users.
- The second step is to click on the icon which says your profile.
- The third set is adding all the required and relevant information which you can see in the given picture.
#23. Addition of Additional Users
Many owners of the websites give the options to the visitors or the readers to contribute to the content or the images of the website to improve the overall design of the website.
This can be done by adding additional users to the website. When additional users are added, then they also get the right to edit the content of the website and edit the photos and other blogs.
This will also provide the readers or visitors a sense of freedom and respect as they can contribute to the aesthetics and relevancy of the website.
The steps to add additional users are as follows:
- The first step is to click on the icon which says, users.
- The second step is to click on the add new option.
- Then you will see a box appear. Fill in all the details and then you can easily add the other desired users.
#24. Adding a Logo
The logo of a website is something from which the visitors of the website will remember the content and the images.
The logo plays a very important role as everything else which the user sees on the website will get faded after time but only the image of the logo is something which will be retained in the visitor’s mind and memory.
The logo should always be designed in such a way that it is easy to remember by the viewer, has contrasting and bright colors and also is written in a readable font.
The steps to set or form a logo for the WordPress website are as follows:
- The first step is to click on the Appearance icon.
- The second step is to click on the customize icon.
- The third step is to upload the logo which the user wants to publish.
- The fourth step is to hit the publish button.
- The logo will be set and published for the particular WordPress website.
#25. Reading Setting for WordPress
Before the user or the owner of the WordPress website publishes any content, image or even a blog on his or her website, it is important to configure the correct reading settings for WordPress.
Every owner or user of the website wants that when the reader or any visitor lands on the WordPress website, he or she should have the best experience in terms of the content, images, blogs, layout and the overall design of the website.
The steps to do the same are as follows:
- Click on the icon which says settings.
- The second step is to click on the icon which says reading.
- A list will open where the owner needs to edit the reading settings according to his or her needs and lookingat the website.
#26. Changing the Admin Username Default
Another important setting that needs to be done in WordPress is changing the default username of the admin.
If this default name is not changed, then it can further lead to situations and problems related to security concerns.
Also, it can be embarrassing on the part of the owner if someone knows that the name of the owner of the website is admin.
The steps to change the default admin username are as follows:
- The first step is to create a new user profile with the name different from the earlier used name. It should be kept in the mind by the user that the admin privileges should be selected.
- The second step is to close or logout from the account of the admin.
- The third step is to log in using the new account which the user has just now created.
- The fourth and final step is to remove or delete the old admin account.
#27. Setting up the Gravatar
Whenever a visitor or a person tries to contact the owner of the WordPress website, he or she will feel satisfied or happy when they see the photo or the face of the owner of the website.
This face can be uploaded and displayed on the WordPress website using the Gravatar. The Gravatar is an online avatar of the owner’s identity.
The Gravatar is accepted globally on various platforms and will help the owners of different WordPress websites to mark their presence in the world of blogging.
The steps to use the Gravatar are as follows:
- The first step is to open the gravatar.com website.
- The second step is to sign up on the website and fill in all the credentials related to the website.
- It should be kept in mind that the user sign’s up with the same email ID which is used in WordPress.
- After doing so, the Gravatar will get linked to your WordPress website automatically.
#28. Caching Plugin
For the efficient and smooth functioning of the WordPress website, different types of plugins are required.
These plugins provide an extra edge over other competitor websites by enhancing user interaction and providing them satisfaction after visiting the website.
One of such plugins is the Caching plugin.
When a person or the user opens the website, the server has to gather a lot of information every time to load the concerned pages. This process consumes a lot of time.
So for avoiding every time delay, the caching plugin is used which saves all the regular pieces of stuff and cookies in the memory and increases the page loading speed.
The steps to install the caching plugin in the WordPress website are as follows:
- The caching plugin can be downloaded from the W3 Cache plugin website.
- The user needs to just visit the website and can install the plugin by just clicking on the install now link.
- The plugin will be installed on the WordPress website of the user.
#29. Security Plugin Installation
Looking after the security of the website is the most basic and primary concern for the owner of a WordPress website.
If proper management of the security of the website is not done, then this can result from loss of data and also the website can become prone to hacking by various hackers which are present all around the world.
If you will go to google and search for the security plugin, then you will get hundreds of plugins that provide security to the website.
But, we suggest you two most commonly used and efficient security plugin that every WordPress website user must have and install.
The two security plugin isthe word fence and secure. Both these provide the best security to the WordPress website and also improves the bugs and frequent intrusions.
#30. Spam Saving Plugin
Spam is something from which everyone in the world who is associated with digital marketing is fed up.
Spam is not at all liked by any person all around the world. Everyone is looking for various ways to remove the spam and reduce their spam score.
For this particular purpose, various plugins are used which reduce the spam score and make the website authentic and relevant.
Many people have a habit of commenting on the different posts or blogs which are posted by the WordPress website owners.
The spam saving plugins help in sorting out these comments and then reduce the spam from the website.
The simple steps to install the spam saving plugin are as follows:
- The best plugin for spam saving is a highly efficient Akismet plugin. This particular plugin helps in the protection of the website from various kinds of spam.
- An API key is needed to install this particular plugin. But this API key can be easily found on various websites by searching on google.
#31. Jetpack
It is not at all easy to run a website. Starting a website is easy but to maintain the pace and to constantly post blogs, videos or articles on the website requires dedication and commitment.
All this will go in vain if it is not posted properly on different social media platforms and also if the reach of the post is not good.
The Jetpack plugin helps to achieve all of this in one go. It provides a one-stop solution for all the requirements of the owner of a WordPress website.
A jetpack helps in many ways like it performs the task of automatic sharing of the various posts and also improves the website reach and search.
The jetpack plugin can be easily installed by going to the plugin section and then selecting the jetpack plugin option.
#32. The SEO Plugin
Search engine optimization or SEO is one of the most important plugins that one has to install in his or her WordPress website.
This particular plugin helps in the overall ranking of the website by telling which keyword is searching the most number of times by the visitors of the website and also which post is generating more traffic.
The keyword which is generating more amount of traffic on the website can be used by the owner in a much more efficient way and the writer can focus on writing more articles using that particular keyword.
The most common plugin which is used on the website for search engine optimization is the Rank Math by google.
It helps to improve the focused content of the website and also attracts more traffic on the website.
#33. Using the Comment Management Plugin
The comment management plugin is one of the most commonly used plugins by the owners of WordPress websites.
This plugin helps in managing the different types of comments which are posted on the different articles or blogs or the images and videos by the visitors on the WordPress website.
For the better engagement of the visitors, prompt replies by the owner of the WordPress website are very necessary and this can only be ensured if the process is less confusing and fast.
The regular service which is offered by the WordPress platform can be easily replaced by a very dedicated plugin used for comment management.
The internet is full of plugins that serve the purpose of comment management on the WordPress platform. But it becomes really necessary to sort the useful ones from the heap.
The best and the most recommended plugin for the management of comments is Disqus. This plugin can be easily downloaded from various websites and can be linked with the WordPress website of the owner.
#34. GDPR
The term GDPR stands for General data protection and regulation. This is an agency that controls the flow of information which the user or the visitor provides on the WordPress website by logging in or signing up.
It should be made clear to the visitor at all points of contact or the touchpoints where the user is providing the information.
The user should not feel any threat regarding the safety of the information which he or she is providing on the WordPress website.
One of the best plugins which are specially used for serving this purpose is the Cookie notice for GDPR.
The steps to do the same are as follows:
- The first step is to click on the tools.
- The second step is to click on the export personal data option.
- The third step is to install the GDPR plugin.
#35. Backup Plugin
Whenever a website is designed, it becomes important from the owner’s point of view that all the data is safe and properly backed up as technical glitches can happen anytime and the data can be lost forever.
For this safety and backup purpose, various plugins are available on the internet which helps in generating quick backup and copies of all the data and images.
One such plugin which is used for backup is the WP my backup plugin. It is easily available on the internet can be downloaded from many sources.
#36. Online Set up of Plugin for Selling
This type of plugin is optional and is not preferred by every website owner. The main purpose of this kind of plugin is to help the owner set up a virtual shop on his or her website.
The plugin helps to set up an online shopping platform for visitors to the website. This platform can be used to sell books, medicines, apparel, shoes, toys, etc. online via the WordPress website.
Many plugins are available on the internet which helps in serving the purpose of setting online selling on the website.
The best plugin for this purpose is easy digital downloads and WooCommerce.
Both these plugins are available online and can be downloaded and installed on the WordPress website.
#37. Checking the Broken Links
The website is affected a lot if broken links are present in it.
A website is a place where many articles, blogs, images, videos, content, and other material are present. All this material is linked with each other and integration is tried to be established.
But while making this integration, as many links are tried to connect, the process sometimes results in the formation of broken links.
Broken links can be formed due to various reasons.
The most common reason for the formation of the broken link is the fact that at the time of posting a blog or article, the link which is provided by the writer has been removed over time.
This results in broken links and needs to remove from time to time for efficient working of the WordPress website.
#38. Google Sitemap
The google sitemap is a path or a destination proof about the WordPress website.
Before posting any articles or blogs, the owner of the WordPress website should submit the sitemap of the WordPress website to the google sitemap or other similar search engines.
As time goes by, the WordPress website will also grow and many links will be embedded in the website. So over time, it becomes difficult for the search engines to keep a track of the data and the content.
The google sitemap can be achieved by the following steps:
- The simplest and the most efficient way of keeping the sitemap of your WordPress website is by using the Rank Math.
- The Rank Math is easily available on the internet and can be easily downloaded and installed.
#39. Visibility of the Search Engine
When an owner of a WordPress website is writing articles or content for the website, he or she should take care of the fact that the incomplete articles are not posted by WordPress.
This can be ensured by a button that tells WordPress to discourage on deny the search engines to find and post any content or article from the website.
This option is very useful as it prohibits the WordPress o post any incomplete article or blog on the website but at the same time is dangerous also.
The risk in this is that if you are denying the search engines to show your content in the google searches, then this can result in loss of traffic from the WordPress website and can result in loss of revenue.
The steps to do the same are as follows:
- The first step is to click on the option which says settings.
- The second step is to click on the option which says reading.
- A dialogue box will open. Tick or untick the box depending on your needs.
#40. Plugin for Image Compression
An article or a blog that is full of content will always be monotonous from the reader’s point of view.
If images are not added in the articles or the blogs of the website, then the website owner will fail to engage the visitor and the average time spent by the visitor on the WordPress website will go down.
For ensuring that the articles have wide reach are loved by all, images are must be included by the website owner. But images are the heaviest part of the article or blog.
It should be taken care of that if a lot of images are uploaded by the owner, he or she should compress the images to make the website light and easy to load and also to remove the chances of any lag or delay while loading.
The images can be compressed by the following steps:
- OnlineImageCompressor.com is a website from where the images can be compressed for free. 20 images can be compressed at a single shot.
- Another website for compressing the images is the Smush image compressor. It is also a free website that offers the service of image compression to the user.
#41. Setting up Discussion Settings
Before the owner of the WordPress website start posting any article, content, images or any other stuff, it should be kept in mind to set up the discussion settings properly.
The internet is full of people who are ready to start conversations and discussions on any topic, anywhere and anytime. They will start flooding the comments section with their conversations.
So, if these spam comments increase over time, this results in a negative impact on the website and also lowers down the speed of the website.
But, these discussion settings can be easily managed by the owner of the WordPress website.
The steps to do the same are as follows:
- The first step is to open settings.
- The second step is to open discussions.
Now, a list will be displayed which will contain various factors like the comment blacklist, email settings, default article settings, etc.
The required changes can be made by the owner in each vertical according to his or her needs.
#42. Custom Theme Installation
Various websites are present on the internet which use themes that are very common and visually less appealing.
The companies and brands which are on the top of the table have websites and themes which are different from other common websites and it is easy for the visitor to remember the website.
Thus, here the custom theme plays a very important role. If the theme is more appealing to the eye, more colorful, more engaging and less cluttered, then it will create a positive impact on the mind of the visitor.
For setting the custom theme, the following steps need to be followed:
- The first step is to click on appearance.
- Then click on the themes tab.
- Then click on the add new tab and upload any theme which you like from the internet.
- You also have the option to customize the theme and mix and match two or more themes.
- When the theme is ready, click on the use theme icon.
#43. Changing the URL Default
The owner of the WordPress website needs to change the default URL of the site. This is because if it is not changed, then it will be prone to hacking by the hackers as they can easily guess the password.
The default URL of WordPress somewhat looks like this:
www.hututu.com//wp-admin
This wp-admin, if not removed from the URL, will lead the visitor directly to the login page of the WordPress website.
For changing the default URL, the given steps need to be followed:
- The most common plugin which is used to solve this purpose is the WPS hide login.
- It can be easily downloaded from the internet and installed on the WordPress website.
#44. Coming Soon Page
It is always important from the visitor’s point of view that what the website will be offering in the coming future.
Thus, for increasing the visitor interaction and to ensure that he or she visits the website again in the future, the coming soon page should be designed by the owner of the website.
This page should be constantly updated to make the people more curious about the upcoming content, images or videos.
Various plugins are available online which can be used to build the coming soon page. One such plugin is the Launcher Plugin.
#45. Optimization Plugin
Every device or service which is being used requires frequent tune-ups and service or maintenance.
If this is done constantly, then this results in improving the speed of the website and also makes the process hassle-free for the user, as well as the owner of the website.
Various plugins are available on the internet which serves the purpose of optimizing the website and the content of the website.
The most common ones are Autoptimize and WP-Optimize.
#46. Disabling the HTML in Comment Section
The person who visits the website tries to spam the website comment section by posting their links.
If the HTML in the comments section is disabled by the owner, then these spammers will leave the website alone as now they will not get any benefit from posting in the comment section.
#47. Removal of Meta Information from Header
The hackers all around the world are always searching for easy ways to intrude into the website codes of others.
One of the most common ways the hackers use to hack the website code is by using the meta-information which is present in the header of the website.
Thus, it becomes really important to remove the meat data from the header of the WordPress website.
For the easy removal of metadata from the WordPress website, the following code needs to be punched in the function.php file of the theme.
remove_action(‘wp_head’, ‘wp_generator’)
#48. Stop Indexing of Core Files
The owner of the WordPress website needs to stop the indexing of the files and the folders of the website by google.
A good amount of budget is allotted by the owner of the website for crawling purposes. If these files are indexed by google, then a fair amount of the allotted budget from crawling will get wasted for no reason.
This issue can be rectified by changing the codes of the robots.txt file. The codes are easily available on the internet and can be simply copied and pasted from there.
#49. Blocking the Access to Folders
Just like my computer on your laptops and desktops, WordPress also saves every file, folder, images, data in its memory and this data can be easily accessed by hackers.
So, for safety purposes, these folders on the WordPress platform are blocked by the owner of the website.
This blocking can be easily done. The simple step to block the access of these folders is by adding the code option – all indexes to the .htcaccess.
#50. Securing WordPress Core Files from Indexing
The core files of the WordPress platform are the most important files which form the base of the website.
All these core files of the WordPress platform can be easily indexed by Google and various other similar search engines.
Thus, it becomes necessary to save these core files from getting indexed.
This can be done by adding a special code to the website’s robot.txt file which will prevent the indexing of the files.
The code is:
User-agent:*
Disallow: /wp-admin
Disallow: /wp-includes
Disallow: /wp-content/themes
Disallow: /wp-content/plugins
Allow: /wp-admin/admin-ajax.php
#51. Fixing Alt Tags
The tags which are used in the images of the articles which are posted on the WordPress website should contain the focus keyword.
This helps to improve the ranking of the images in the google search engine images category.
The alt tags can be easily inserted in the images using the options which are available in WordPress.
The user just needs to type in the alt tag under each box which is provided for the image.
With this part of this article, we aim to provide our readers with the best set of must-have WordPress settings.
We understand that the list of the settings provided above is very long, but these settings can be easily configured using the easy steps which are provided with each type of setting.
Also, if these settings are configured and are updated from time to time, then this will result in improving the ranking of the website and also optimizing the website.
The user can also improve the reader engagement of the website and increase the average spent time on the website pages.
10+ Ways to Promote Your Blog and Get More Traffic FAST!
Without promoting your blog post you cant achieve your blog writing goal. So the most important part after publishing a blog post is to promote that.
You have to put all your efforts to promote a blog post so that it can reach its targeted audience.
In other words, success of your blog completely depends on the work you do after publishing a blog post.
In this part of our article, we will give you the best ways to promote your blog so that it can get traffic.
But before sharing those blog promotions techniques we assume that you have:
- Optimized Your Blog Post title to the best
- Have the best content in it
- Your article is solving the user’s query
- On-Page SEO optimized
Before promoting your content make sure that your blog post follows the above points. Because if your post has not the proper knowledge which the user is searching for then there is no value of the promotion.
We assume that you have more money to invest in Blog Promotion but if your blog has not the right content than no promotion is going to work.
So before promoting your blog make sure that it has the best content and properly optimized.
1. Family And Friends
The first thing to do after publishing a blog post is to share it with your friends and relatives. If they have an interest in the topic you have written then they will read your post and share it with their friends.
They also give you suggestions regarding your blog post or if it needs any improvement.
Always, ask feedback from your readers as it will help you to improve your skills.
So the first part of blog promotions is to share it with your family and friends.
2. Share with your colleagues
The next thing is to share your blog with your colleagues. Yes, if you are working in an organization then you must have some friends who know your work.
It is most important to share your blog post with them as they know you closely. They also can help you to improve your content by giving their valuable suggestions.
Also, tell them to share your blog with their friends and family so that you get maximum exposure.
3. Instant Sharing
Now a days social media plays an important role in promoting your blog. Most of the people use social media like Facebook, Instagram, Twitter.
So you have to set up instant sharing services in your blog so that when you publish a post it will automatically shares it in your social media page.
There are many free and paid plugins available in the store to do this. You can use any of them.
4. Share It On Twitter
The next medium to promote your blog is Twitter. It is the most used social media network and most of the Twitter users are active.
So it is the best place to promote your blog. As we discussed above you can automate this process.
But that dosent mean that automation will do all the work for you. Twits are very short available in nature.
So share your post on Twitter frequently to get batter result. When your blog becomes success you will get organic shares.
5. Share On Facebook
Like twitter Facebook has also large user base. If you want to promote your blog post then there is nothing batter than Facebook.
It is the most used social media network in the word. So always share your post on Facebook after publishing.
6. Share on Your Facebook Page
Always remember that if you want to get sucess in blogging field and want to do authority blogging then you must create a Facebook page for your Blog
After that promote your Facebook page and drive likes. More the like more visit you get. So always make a Facebook page for after start a blog.
You know that your Facebook page has user base. Now you have to use those user as your blog traffic.
Share your newly published blog post on your Facebook page so that it can get traffic.
You can also share your post on many other Facebook pages related to your Niche by asking the Admin of that page.
Sometimes they will ask you to pay some money but believe us you will get amazing results.
7. Share On Facebook Groups
Do you know there are thousands of Groups available in Facebook related to your niche. So what you are waiting for.
Just create a Facebook group related to your niche and ask people to join it. After publishing new blog post just share it in your Facebook group.
You can also share your blog post on other Facebook groups. Have you noticed that there are thousands of Public Facebook groups where anyone can share their content?
You also share your blog post their and drive to your newly started blog.
8. Share On LinkedIn
Do you have a Company Page on LinkedIn? If yes. then great. If no, just create it. Nowadays LinkedIn is the most powerful platform to promote your blog.
The best thing about LinkedIn is it is the Platform full of professionals. So here there are more chances of getting traffic to your blog.
They also give you suggestions to improve your quality and also guide on How To Start A Blog.
9. LinkedIn groups
Share your blog post in LinkedIn groups. Before publishing follow group guidelines about sharing links and read all the terms and conditions.
10. Submit Your Site On StumbleUpon
StumbleUpon is an amazing tool for finding content. Although it is relatively small and has about 30 million users, it is still a platform that sellers have never used.
Via StumbleUpon’s toolbar, users click the “stumble” button and are presented with a random page based on their topic preferences. It’s essentially channel surfing for the web. If you haven’t used Stumbleupon before, try it out!
In addition to accessing new content, you can also provide your own content. Once logged into the StumbleUpon site, it is used by other users. If other Stumblers like your offer, they can refer to ‘such’. Finding their favorite pages, some of the Stumblers will appear on the StumbleUpon ecosystem.
For best results, post it on StumbleUpon. Capture some pages, follow multiple users and submit content. Don’t go there. Find a balance between sharing your content with others.
11. Submit Your Site On Reddit
Reddit is also an amazing platform to drive traffic to your blog. Many famous bloggers use this platform to promote their blogs.
You can also use this to share you blog post and get traffic. All the traffic from Reddit are super targeted audience.
12. Use Quora
Quora is the most used question answer community and almost 1 Billion users use this platform.
This is one of the best platform to promote your blog post. If you have just started a blog then we recomand you to use Quara to get traffic.
13. Instagram
Instagram is the most used social media app among youngsters. So this can be a great platform to promote your blog post.
You can make Instagram pages related to your blog and promote your content.
If you want to start a blog then these all are the best way to promote a blog.
8 Powerful Ways to Monetize a Blog? [Complete Guide]
With the advancement of technology and mankind moving toward the digital and online transformation, people have become more sophisticated and are looking for smart ways to earn quick bucks.
Pick up any segment or field of work, almost everything which was once being sold or traded by the offline channel has now shifted to the online channel.
This online channel is gaining huge popularity and is quickly climbing the ladder of eternal success because of many advantages which it offers over the offline structure. Some of the advantages of the online channel over the offline are:
- The online channel is fast and efficient.
- Returns and replacements are easy in the online channel than the offline channel.
- The person can order the desired product by the means of a single click using his or her smartphone or laptop.
- Refunds are now being processed at a faster and efficient pace by the companies.
- The user does not have to go for a trial to the offline store, instead, the product will be delivered to the directed address by the user.
- Lucrative discounts and cashback are being offered on the online channel which is absent in the offline channel.
- Loyalty points are offered to the frequent online buyers which can be used or redeemed in further orders by the user on the website.
- Customer retention is easier in the online channel when compared with the offline structure.
Apart from the various advantages which the online channel offers over the offline channels, the Online channels also result in cost-cutting and saving when compared with the offline channels.
Online vs Offline Cost Reduction
When an online channel is used by the seller, then it can result in saving the cost incurred in various ways when compared to his or her offline selling. The various reduction in costs are as follows:
- The cost of setting up of offline store is completely saved in the online channel.
- No inventory has to be kept in the warehouse as the product can be made available as and when it is ordered by the client.
- The chances of incurring loss due to the damage of the products or inventory are removed.
Apart from all the above-listed advantages, the major advantage which is not only benefitting the owners or the sellers but is also boosting the economy of the country is the job opportunities which the online channel is providing.
As we know that a sophisticated online platform is only made when it contains a good logistics team that ensures no delays or lags in the delivery of the goods or services, proper integration of online and offline channels and a proper designated procurement team for procuring the required products from the market.
Thus, when all these teams are integrated, then only the online platform works. For this, a proper enterprise resource planning (ERP) system has to be maintained.
So, the setting up of a single online platform results in the integration of all the above-listed teams which in turn results in creating thousands of job opportunities for the weaker section of the society and ensuring regular income to them.
Another wonderful way of earning quick bucks using the medium of an online platform is by writing blogs and then monetizing it.
Thus in this article, we would be covering how to monetize a blog and the different ways in which huge revenues can be generated using a blog as a medium.
A blog is an article or informational guide which is written by a person after hours of research in and out about the topic from various authentic sources.
The main purpose of writing a blog is to impart information to the reader about the topic on which the blog is written and to provide a one-stop solution to the reader about the same.
The process of writing and posting blogs online on a website or other informational corners is known as blogging. A person who is involved in the process of constantly writing blogs and posting them is known as a blogger.
Blogging is being done by lakhs of people all around the globe. But all blogs are not successful in the online world. Only a few handfulsof blogs that follow the rules of SEO and blogging can rank themselves on the top of the page.
People think that writing a blog is easy but they forget to concentrate on the fact about how to monetize a blog and reap proper benefits.
The blogging world has various rules which if followed religiously can result in giving huge benefits to the owner of the blog.
How to Monetize a Blog?
Various methods can be used by the owner of the website or the content writer of the blog to monetize the blog. Some of the most effective and commonly used methods are listed below:
Advertisements on the Website/Blog
The most common way which is used by the bloggers all around the world to monetize their blog is by the means of installing pay per click or the PPC advertisements on the website or the blog.
Many bloggers or content writers have the misconception in their minds that the Pay per click or the PPC is the best and the most effective way of monetizing the blog. But it is not.
It should be kept in the minds of the bloggers that they are getting traffic of atleast 15000 people on the blog or the website. If they are getting less than they would not be able to generate any revenue from the advertisements.
Minimum traffic of 90000 to 1 lakh is required per day on the blog or the website if you want to reap in the real benefits using the pay per click or PPC option on the blog.
Affiliate Marketing Technique
One of the best and easy ways of monetizing your blog is by performing the concept of affiliate marketing of any other big online purchasing website platform.
The technique of affiliate marketing is a very helpful tool for monetizing the blog when the blog is just in the initial stages of the launch and the owner does not have his or her products or services to sell.
The affiliate marketing works as a push for the bloggers as the bloggers just need to create good quality content from various authentic and relevant sources for the products which have a good amount of online sales.
If the content for these products is good and proper link is provided for the purchase, then for each purchase through the blogger’s link, the company or the owner of the selling platform has to pay the blogger commission on a per-sale basis.
During the times of festivals and sales, the bloggers can earn huge bucks if the content provided for the affiliate product is relevant and authentic.
EBooks Selling
Selling eBooks is another very healthy way of monetizing your blog. Various blogs are present on the worldwide network and their count keeps on increasing every day making the competition more tough and fierce.
The best way to tackle this is by creating an eBook that relates to the content on which the blog has been written by the writer.
The readers will get an add on service of the eBook when they visit the website and read the blog.
Further, with time, the blogger can also form a sales funnel with which he or she can integrate their eBook with the blog to monetize the blog. The eBook will automatically be sold using autopilot.
This will only require aonetimeeffort from the blogger’s side to produce the eBook with good content and pictures but the benefits that he or she will reap over time will cover all the expenses and result in good profit.
Email Marketing
The concept of email marketing can also be used by the writer or the blogger to monetize a blog.
Email is free of cost to send and can also be sent to thousands of subscribers or potential buyers in one single shot.
This can be done by using various email marketing platforms like the mail chimp, Aweber, Infusion soft and convert kit.
For email marketing, the content writer or the blogger has to design a wonderful eye-catchy email which makes an instant impact as soon as the reader opens it in their respective devices.
The blogger should also incorporate all the affiliate links of the products which are available on their website in the mail itself to increase the chances of purchase of the product from the email itself.
Worldwide research says that there are high chances of a writer or a website owner earning approximately $1 from each subscriber every month which is a very good conversion rate.
Selling Digital Products
The world is constantly evolving in terms of technology and innovation every second.
The technology which was once considered to be a game-changer a few months’ backsis now considered to be obsolete as some other company comes up with a better version of it.
Thus, this constantly changing market scenario can be used by bloggers to monetize their respective blogs or websites.
The blogger can manipulate their blogs and add various services for the readers which fill a void in their lives and adds value to their work.
The blogger can sell various digital products like pdf converter, image compressor, video editor, zip file creator, etc. and then merges it with the relevant content of his or her blog on the respective websites.
The blogger can also make a combination of software as a service and other software components and sell them through the medium of his or her blog.
This will result in generating a lot of revenue from the blog and increase the profits of the blogger.
Selling Coaching Services
Coaching or mentorship is required by millions of people all around the world for various day to day tasks. Some require it for learning swimming, some for software skills and some for other educational related work.
A blogger can grab this opportunity and make the most of it by selling these coaching services through the medium of his or her blog.
Coaching services related to mental health, psychology, life coaching and many more can be offered by the medium of blogs and huge benefits can be reaped in.
Also, this method does not require much of the initial investment and the same material which is prepared for a client can be used again and again for solving the similar kind of problems of different clients.
Apart from all this, it should always be kept in the mind by the blogger or the content writer that the purchase procedure for these services should be kept very simple with minimum steps.
Selling Online Courses
Another wonderful method which is the answer to how to monetize a blog is selling online courses on the blogs.
The content writer or the blogger of the website can provide links to the courses which are made by themselves or are the links of any otherwebsite. So, if a reader purchases acourse using your link then you will get the share from affiliate marketing. Selling the courses online is a brilliant way of generating passive income.
The blogger just needs to keep in his or her mind that the courses are in proper alignment with the content or the topic of the blog as if it is not so, it can result in generating negative publicity for the blog and as well as the course.
Working as a Freelancer
Once a person has started his or her blog and has got hands-on experience by posting several articles on it, then they can dive into the world of freelancing and do the same blogging work for other websites.
The skills like search engine optimization, creative writing, graphic designing, social media management, etc. once learned can be used on various platforms for earning quick bucks.
Thus, for this, the blogger can design his or her blog accordingly and tell the world that a freelancer is available for your service and also post some links from your previous work as evidence for the potential clients.
FAQ’s on Monetize a Blog
What are some of the famous ad networks who approve the monetization of a blog?
Some of the world-famous ad networks which approve monetization of posts on the internet include Google AdSense, Media.net, info links, propeller ads, and the advertiser network.
When should a blogger start monetizing his or her blog?
Some of the world-famous ad networks which approve monetization of posts on the internet include Google AdSense, Media.net, info links, propeller ads, and the advertiser network.
What is the easiest way to get the blog accepted by the ad network in one shot?
The easiest way to get your blog accepted by a reputed ad network in the first go itself is by making an affiliate marketing blog that has relevant content related to the products being sold.
The main aim of this part of the article is to provide our readers and bloggers the best possible ways and methods on how to monetize a blog.
We have tried to cover almost every aspect related to the field of blogging, digital marketing and even some portions of search engine optimization (SEO).
In this article on how to monetize a blog, we have covered the techniques of email marketing, advertisement, eBook selling, selling the digital products, securing sponsorships and also selling various courses by the means of blogs.
It should be kept in the mind by the readers and the bloggers that the techniques covered in these articles are not the only techniques used worldwide to monetize the blogs.
Conclusion
The world of blogging is governed by five basic laws which if followed religiously, can result in generating huge profits for the owner.
The laws of blogging world which can answer the question of how to start a profitable blog are as follows:
- Quality of the Content
It is very important for the blog to succeed that the quality of the blog is maintained throughout the journey. Writing the blog just for the sake of pushing enormous content on the website will not be productive.
Whenever a person is writing a blog, he or she should keep in his or her mind the fact that they should pick up the data only from a reliable, authentic and verified source.
They should also quote or cite the sources from which they have picked up the content and then combined it to form the blog for the readers. This will give an authentic look to the blog and gain the trust of the readers.
- Focus on the Segment
The writer or owner of the blogging website should be focused on the segment of the industry on which he or she wants to write and publish their blogs.
They should have a clear picture in their mind whether they want to target a niche and a particular segment of the audience or they want to write the blog to cater to a general and mass portion of the audience.
But, it is always advised to write blogs for a specific and target audience so that the essence of the blog is not lost and at least that particular portion of the society is always present to read your blog.
People always come back and visit a particular blog when they find that this particular piece of information is filling the gap in their lives and has an important stand in their daily routines.
The image below gives an example of the focus on a blog related to the topic of coffee and coffee lovers.
- Reader Engagement
Engagement is important both online as well as offline channels. Without proper engagement, the traffic on the website or the blog cannot be attained by the owner or the writer.
The blogs should be written in such a way that the content forces the readers or visitors of the website to stop and read the full theory present in the blog.
The blog should also contain relevant photos and videos.
It should be kept in the mind by the writer or the owner of the website that more engaging is the blog, more are the chances of people spending time on the website and purchasing the products through it.
- Authority of the Blog
The term authority means the authenticity or the accuracy of something. In terms of blogging, the term authority depicts the meaning that how much are you known or famous in the world of blogging for that particular segment.
If the authority of the blog is high, then it becomes very easy for the writer or the owner of the blog to monetize the blog and reap in the benefits.
This can be done if the owner or the writer already has a well-established page running on different social media platforms like Facebook, Twitter or Instagram and can divert the traffic from there to his or her new blog.
- Value of the Blog
Not only the blogging industry but the key to success or excel in any field is to provide the customers or the readers an additional value from your product or service offerings.
When the customer or the reader gets a value that is not provided by the competitor or any other similar source then this results in making the customer delighted and he or she feels that they are important to the seller.
In terms of blogs, the writer or the owner of the website can provide additional images or videos which shows tutorials and easy to follow steps which will act as an add on for the readers and will result in increasing the conversion rate and final sales.
The writer of the blog can also provide various infographics and Gif files that the others do not provide for the convenience and ease of the readers and the blog visitors.
We hope you the way which we described here to Start a blog in 2020. According to us this is the complete guide on How To Start A Blog In 2020.
If you still have any questions in your mind please comment below. We will answer every question.